Setting Up Sales
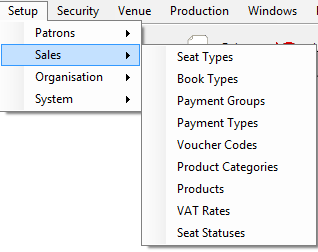
These menu options are described below.
Seat Types
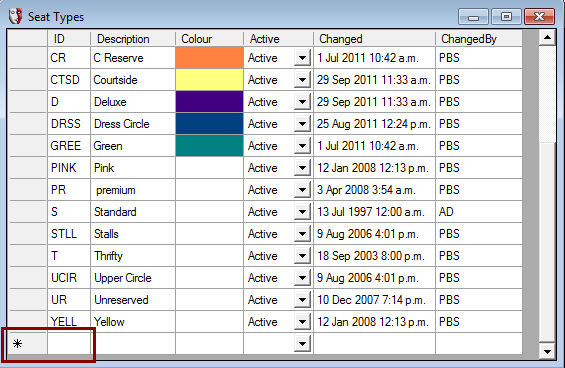
This is for a category of seat where the venue has more than one type such as 'A Reserve'; 'Stalls' or 'Premium'. At least one type needs to be defined.
A ticket Price in the system is a combination of the Book Type and the Seat Type. So for example an 'Adult' could be a different price depending where in the seating plan (Seat Type) they are sitting.
Setup > Sales > Seat Types brings up the following table, add a new Seat Type directly on the last row marked with an *:
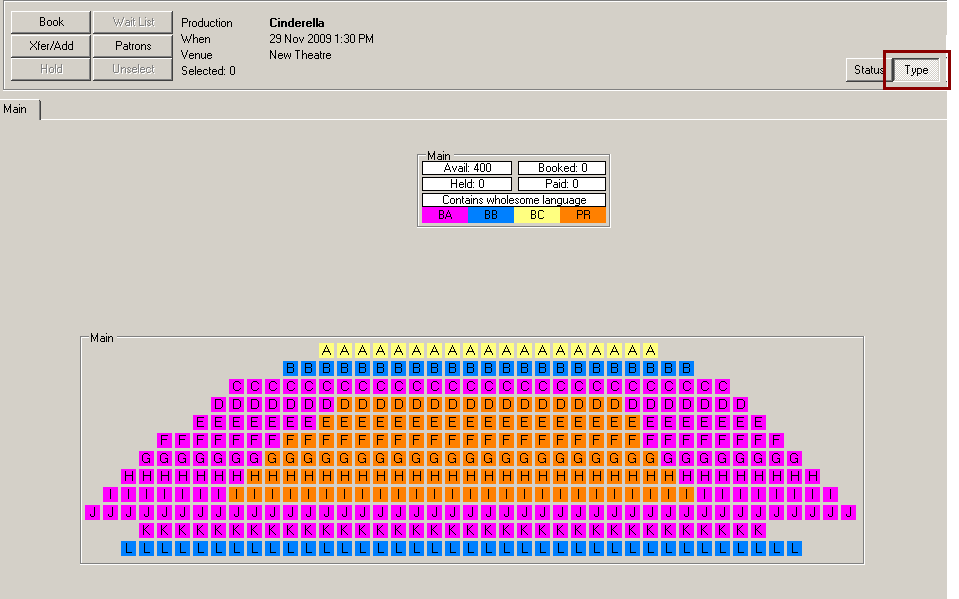
The Box Office Module has a feature whereby the Seating Plan can be viewed in the 'Type' mode, which will show the seating plan with all its various Seat Types contrasted by Colour. An example of how that could look is this:
In order to be able to use this effectively, each Seat Type needs to have its own colour. To define the colour for the Seat type {Double-Click} on the Colour Box on the Seat Type Form, and a palette of colours to choose from will display:
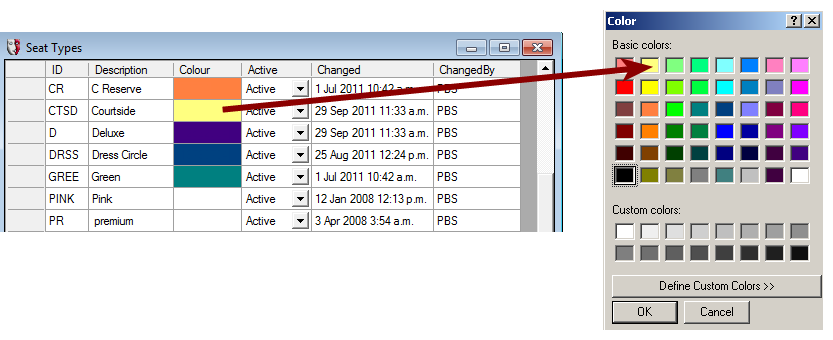
{Click} on a colour, and then select the [OK] button to select it.
Book Types
A Book Type may also be called a discount code, and there will be a Book Type for each full-price and discounted category of tickets made available for sale. The price of a ticket is determined when the Book Type is combined with a Seat Type (e.g. Standard, Premium Reserve, etc).
Open Administration and select Setup > Sales > Book Types from the menu.
Click the New button in the toolbar to add a new Book Type, or select from the list to edit an existing Book Type.
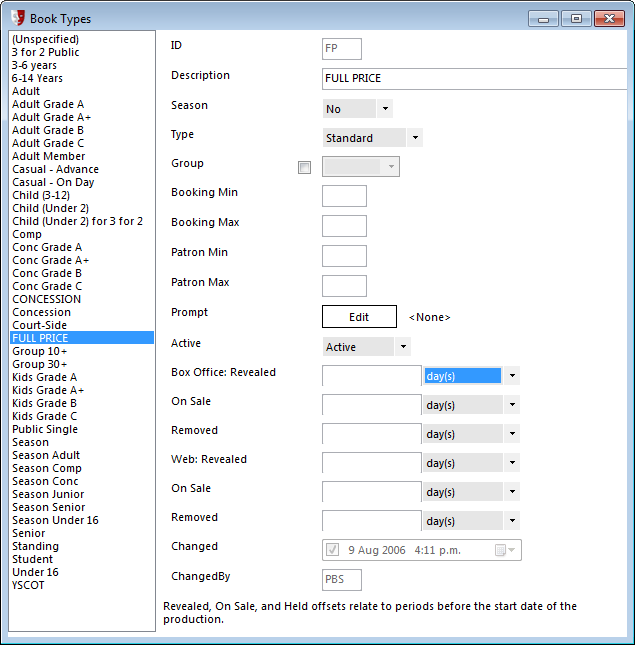
The Season field will default to No, but should be changed to Yes for book types intended for subscription or season sales. For instance, a book type such as "Standard Subscription", "Season Adult", or "Subscription Snr Conc" should have the Season field set to Yes. When setting up a season, only book types that have Season set to Yes will be available.
The Type field has options Standard, Agency, and Concession. Book types identified as Agency or Concession are given special treatment. Agency tickets do not have the book type or price printed on them. Concession book types require proof of concession (such as a student ID card), and so the web module will not let Concession tickets be posted.
Group is used to associate a book type with a Member Group that is eligible for the book type. When combined with the Web Module, sales of tickets for this book type can be restricted to current members of the Member Group.
Booking Min specifies the minimum number of seats in a sale that this book type can be used for. For instance, if a book type "Group 10+" is created, setting a Booking Min of 10 will ensure that any booking made must have at least 10 seats to qualify to use the "Group 10+" booking type and its associated seat price.
Booking Max specifies the maximum number of tickets in a sale that can have this book type.
Patron Min specifies the minimum number of tickets an identified patron can purchase of this book type. It would be normal to set this field to 1.
Patron Max specifies the maximum number of tickets an identified patron can purchase of this book type. Use this field to control bulk-buying of tickets.
Prompt is an optional setting to create a message to be displayed to the operator if the book type is used in a sale. For instance, you might add a prompt for concession book types, reminding the operator to "Ask patron for valid ID". Click Edit to create or edit the prompt message.
If the Active field is set to Active, this indicates that the book type is currently used. When a book type is no longer used, change this field to Inactive. Once a book type has been used, it cannot be deleted from the system and can only be marked as Inactive.
Book Type Timings
The Book Types window include six fields that specify Book Type Timings. These relate to when the opportunity to purchase tickets for a production at a particular price point associated with a book type is Revealed, made available On Sale, and when the book type is Removed as a purchasable book type. Separate settings for the Box Office and Web are provided.
Each of the periods that can be selected for these fields is relative to the start date of the production, expressed in days or weeks:
- Revealed determines when the book type becomes visible.
- On Sale determines when purchases of seats using the book type become available.
- Removed determines when a book type stops being available as an option for purchasing seats.
For instance, you may wish to offer "Early Bird" discounted book types, but only standard priced tickets will be sold in the last month before a production starts. For each of the book types you wish to discount, you would create a similar "Early Bird" book type, but you would set different Book Type Timings for each book type. As an example:
Early Bird Adult:
Revealed: 60 days [before the start date of the production]
On Sale: 60 days [before the start date of the production]
Removed: 31 days [before the start date of the production]
Full Price Adult:
Revealed: 60 days [before the start date of the production]
On Sale: 30 days [before the start date of the production]
Removed: 0 days [before the start date of the production]
These settings will allow Early Bird Adult sales from 2 months out from the production, though the Full Price Adult ticket option will be visible at this time, so patrons will be aware of the price they will pay if they delay their ticket purchases. The Early Bird Adult option will be available up to 31 days before the production starts, and the next day the Full Price Adult tickets will replace it.
Note that the timings set for a production may override these settings. The ticket sales timings for a production are set in the Edit Productions window on the Timing tab. See Editing a Production for more information. The settings for a production take precedence. If a production makes use of the Early Bird Adult and Full Price Adult book types in our example above, but there is a production-specific setting of 45 days before the production’s first performance when tickets go On Sale, then Early Bird Adult tickets will only be available for purchase from 45 days before the production, not 60 days. The Full Price Adult tickets will still go on sale 30 days before the production starts.
Payment Groups
Setup > Sales > Payment Groups brings up:
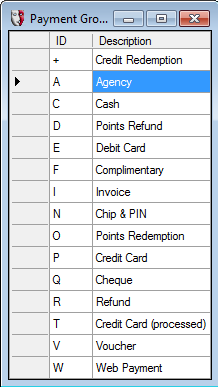
Although they cannot be added or removed here, the description can be edited within the Description grid.
The Payment Type Form (below) is dictated based on what Group it is set as. See Payment Types below.
Payment Types
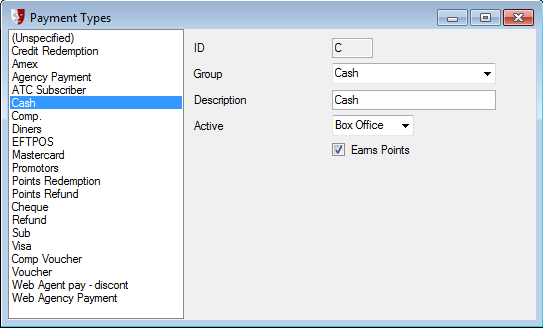
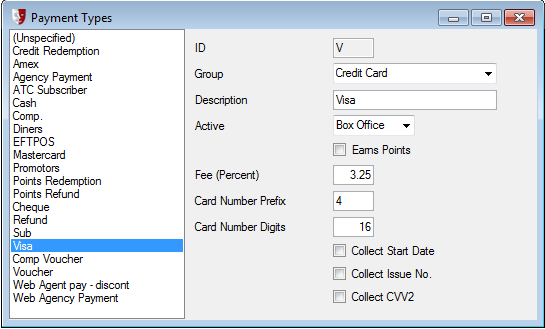
To add a new Payment Type, use the [New] button on the Toolbar:
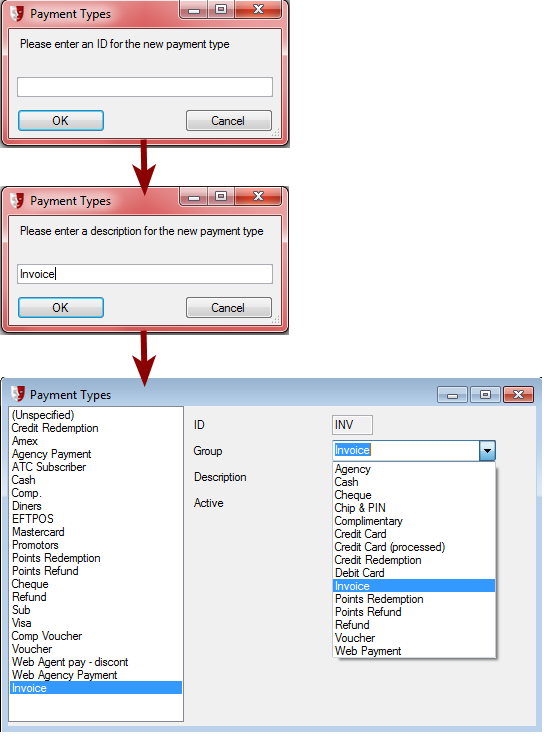
Select a Group for the Payment Type to belong to, from the dropdown list.
Specify a plugin in the Plugin Name field.
Payment Schemes
Ticket sales can be made using multiple payments. These payments do not need to be made at the same time, but may be made over a period of days or weeks. Payment Schemes is a feature that offers a way to manage such sales by providing standard payment installment schemes.
To create or edit a payment installment scheme, select Setup > Sales > Payment Schemes.
To add a new payment installment scheme, click the New button in the toolbar.
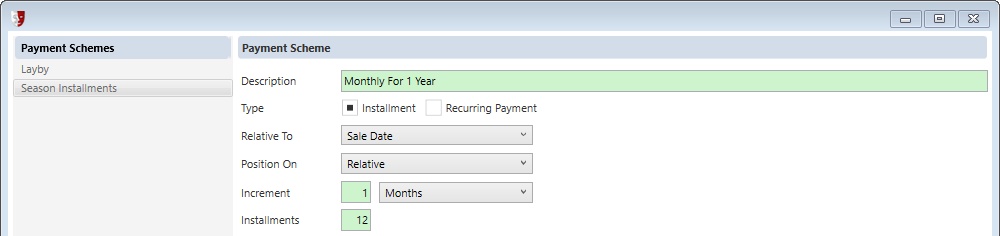
Provide a Description as a name for the payment scheme.
Select the Type of payment scheme, either Installment or Recurring Payment. At the current time, choose Installment; the Recurring Payment option is a placeholder for some functionality that has not yet been implemented.
Specify if the payments are commenced Relative To the 1st Performance Date, Sale Date or a Fixed Date. To set the timing of payments, choose the payment Position On as Date, Day Of Month or Relative. Some combinations of the Relative To and Position On options are typical, though there are some combinations that aren't useful. Setting up a scheme with Position To set to Relative and commencing Relative To a 1st Performance Date or Sale Date is sensible. Likewise, a scheme that is Relative To a Fixed Datecan be usefully combined with a Position On option of Date or Day Of Month. However, a scheme that is positioned Relative to a Fixed Date is not useful because the fixed date is not selectable. Relative To a 1st Performance Date or Sale Date with a Position On option of Date or Day Of Month is not useful because the day or date selection overrides the performance or sale date.
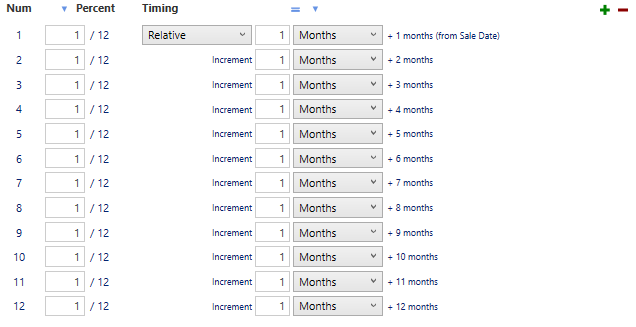
Increment sets the period between payments. Specify a number in the first field, then select Days, Weeks, Months, or Years.
Assuming the Installment option was chosen over Recurring Payment, specify the number of installments that are to be made.
When you are happy with these initial settings, click the Create button.
 If your screen is a lower resolution screen with 720 or 768 pixels of height, you may need to use the scroll bar on the right of the screen to reveal the Create button.
The new payment scheme will be added to the list in the Payment Schemes window., and the window will change to show the full details for the new payment scheme.
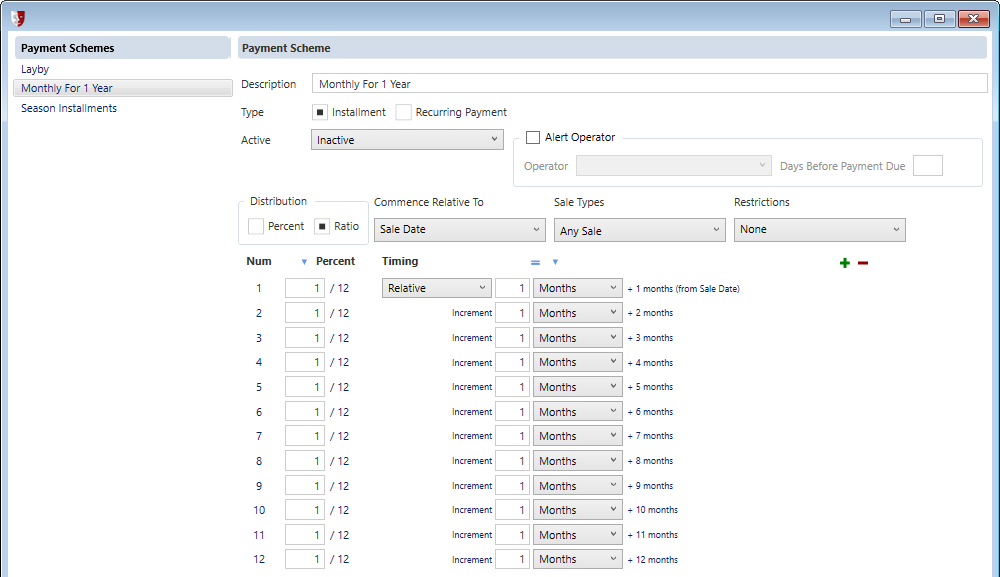
To change the name of the installement, edit the Description field.
Active provides the options All, Box Office, Inactive, Restricted and Web. When Inactive, the payment scheme is disabled. Select Web for payment schemes that can be selected by customers using the website to purchase tickets or products, Box Office for payment schemes that are only to be used from the box office, or Restricted if the use of the scheme requires an operator with special authorisation. All will make the payment scheme available to all users.
Tick Alert Operator if you wish to have the PatronBase system message an operator when an installment payment is about to come due. Select an Operator from those listed in the system, and specify the number of Days Before Payment Due that the system message will be sent to the operator.
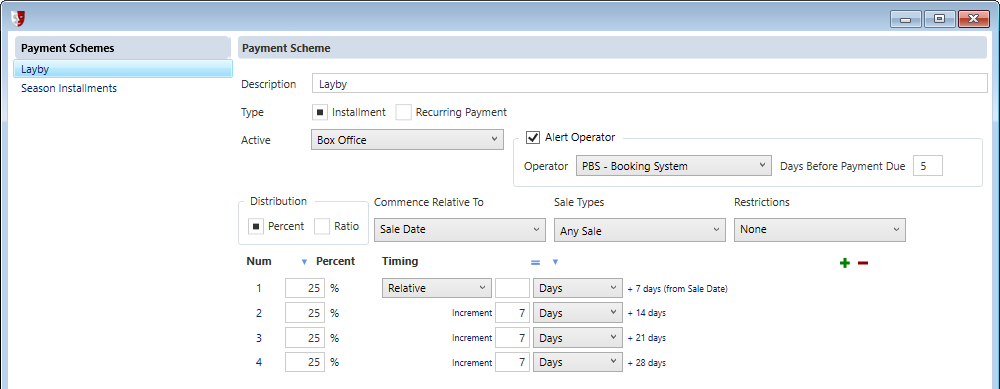
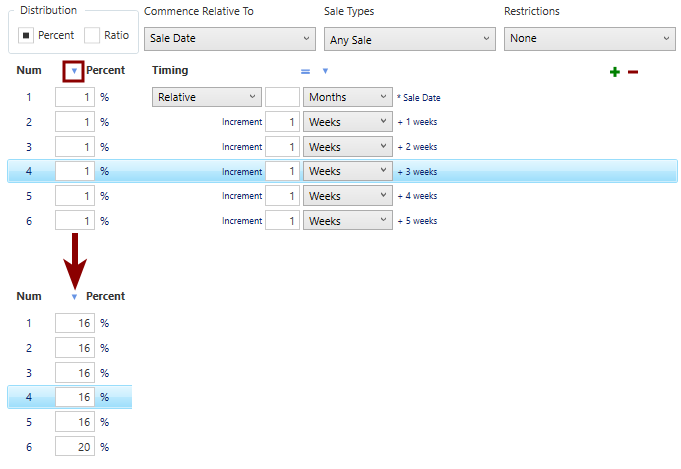
When the payment scheme was created, a series of installment payments will have been defined based upon the initial selections made. The installments will have been created with a Distribution option set to Ratio. This will be the typical option selected for installments, and the default installment amount will have been pre-selected to be 1/(number of installments). You can choose to change the Distribution to Percent and specify a percentage of the total amount for each payment, but note that only whole numbers can be entered as percentages.
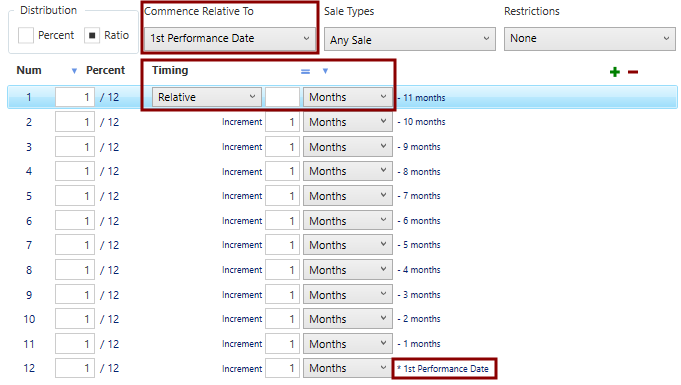
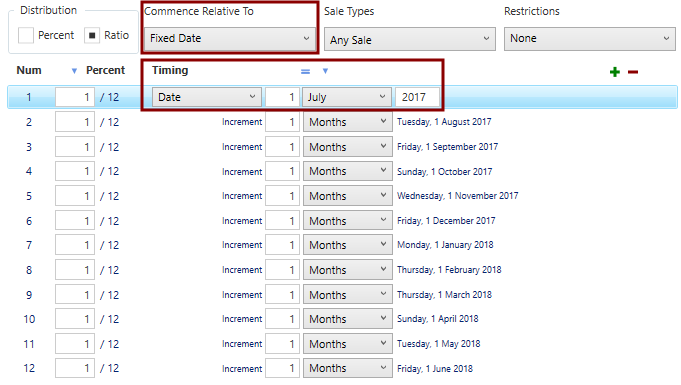
The option you selected for the Relative To field when creating the payment scheme appears in the Commence Relative To field in the payment scheme details, and can be changed from what was initially selected, if necessary.
Sales Types constrains the use of the payment scheme to Donations Only, Performances Only, Performances And/Or Donations Only or permits it to be used for Any Sale.
Restrictions provides the options None, Before First Performance and Before Last Performance. The restrictive options are intended to ensure that payments are made at appropriate times relative to performances. Before Last Performance is intended for situations where tickets to a number of performances are purchased, such as for a season, and although full payment is not required before the first performance, it is expected before the last in the season purchased by the patron.
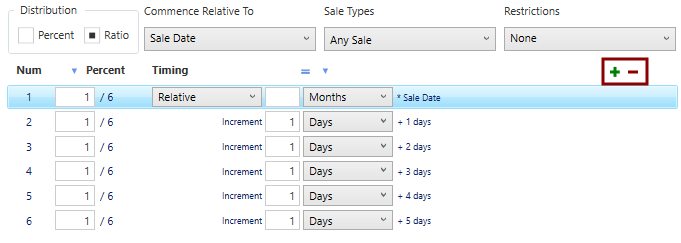
At the bottom of the window will be a series of rows, one for each installment that was specified when the scheme was created. Note that at the right side of each installment is an automatically created description that helps you understand when the installment will be due. Depending on the settings, these will describe the due date in relative terms or absolute dates.
The Position On option selected when creating the payment scheme appears in the Timing field in the payment scheme details, and can be changed from what was initially selected, if necessary. Depending on the option selected, different details need to be provided to complete the timing for the first installment.
If Relative has been selected for Timing, you need to specify a number and whether this is in Days, Weeks, Months, Years, Sundays, Mondays, Tuesdays, Wednesdays, Thursdays, Fridays or Saturdays. If your Commence Relative To is set to Sale Date, having any number other than 0 in here will postpone the first installment payment to the specified period. Use 0 to make the first installment due on the Sale Date. If Commence Relative To is set to 1st Performance Date, use 0 to ensure that the last installment is paid on or before the first performance. Subsequent installments can continue to be spaced as specified when the payment scheme was created.
If Date has been selected for Timing, specify the date using the provided fields.
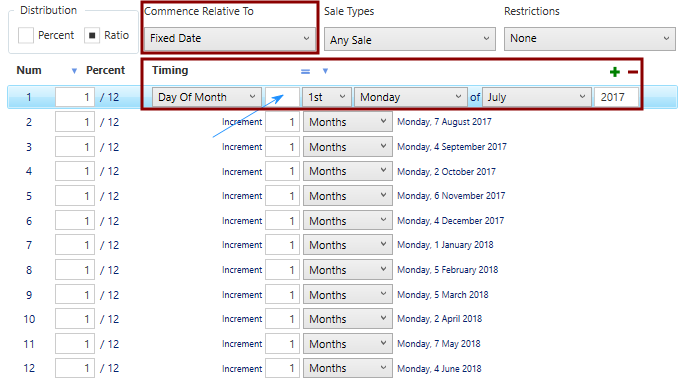
If Day Of Month has been selected for Timing, select options to describe the day of the month payments are to be made. Note that the field used in the other two options, pointed at here with a thin blue arrow, does not need to have anything entered into it as it is not used for the Day Of Month option.
If you have some very specific needs, it is possible to adjust the period between installment periods on a case by case basis, and the descriptions to the right of the installments will be updated to help you understand the result of the changes you have made. This irregular payment schedule will not be a typical use situation.

Use the + and - buttons to add or remove installments.
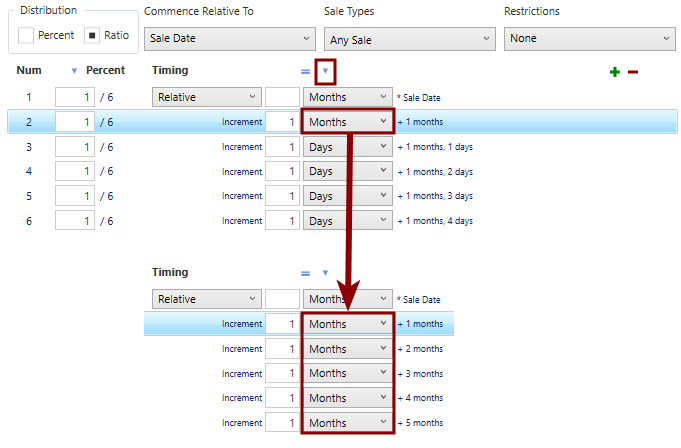
The upside-down triangle button will copy down the selected units of the increment period. Select from the options of Days, Weeks, Months or Years then click the triangle button. The selected option will be copied down to the matching fields in all the rows except the top row.
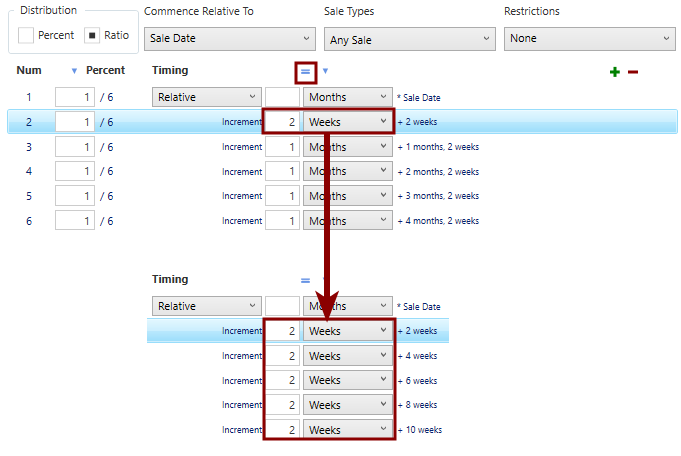
The = button will copy down the currently selected increment period definition. Specify an increment period with a number and one of the options from the Days, Weeks, Months or Years list. Click the = button and all the rows (except the first row) will be changed to match the selected increment period.
You can edit the installment percentage or ratio, although typically it makes sense to have the same proportion in each installment. Changing the number for a ratio will result in the denominator part of the ratio being adjusted also, so the amount paid in all installments always works out to the sale total. If the Distribution is set to Percent, you need to make sure the percentage adds up to 100%, as this is not enforced, and under- or over-payment is possible. Having made a change, click the upside-down triangle next to Ratio to set all increments to the selected number and balance the total to match the whole sale.
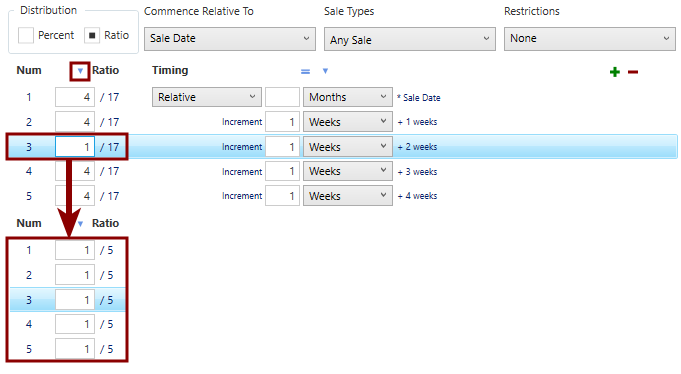
If this upside-down triangle next to Ratiois clicked when Distribution is set to Percent, the installments will be set to approximately equal whole percentages, with any necessary extra required to bring the total to 100% added onto the last installment.
Voucher Codes
Selecting this will list all Voucher Codes currently active:
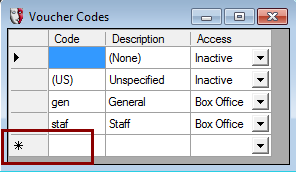
Selecting the * row allows adding a New Voucher Code.
The description can be edited at any point.
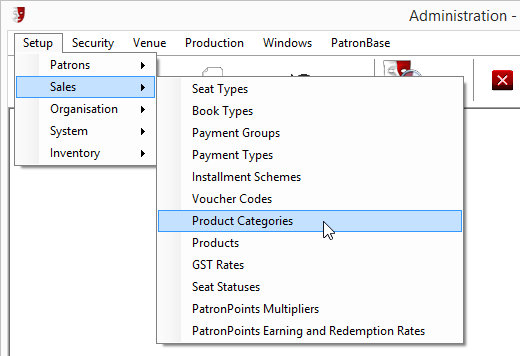
Specifying Product Categories
In Administration, select Setup > Sales > Product Categories.
There has to be at least one product category, so one called (Unspecified) will be the initial default. You can select this and change its details, including the Description, to something you will use. Select an item in the list to change the Description or other settings.
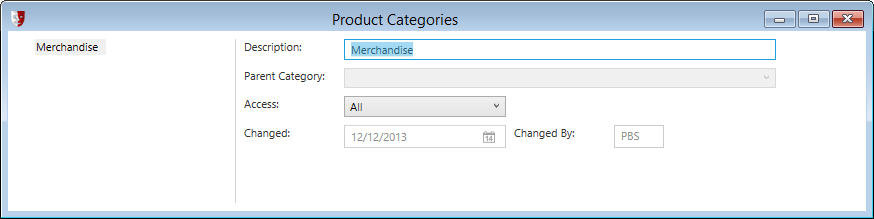
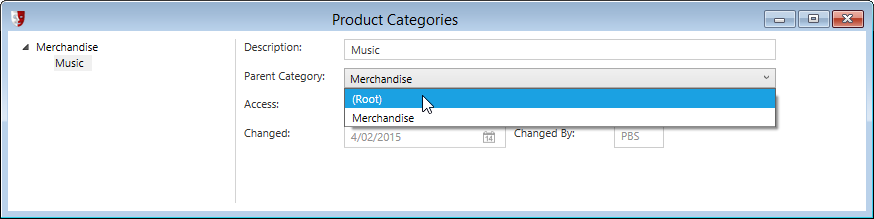
To add a new product category, click the New button in the toolbar. First, give the new product category a Description. Here we are adding a product category Music.
Note that the new product category was added as a sub-category under Merchandise. If you want the new product category to be a top-level category, we need to change the Parent Category field. From the list of options, you can choose (Root) to specify that the new product category has no parents, and is a top-level category.
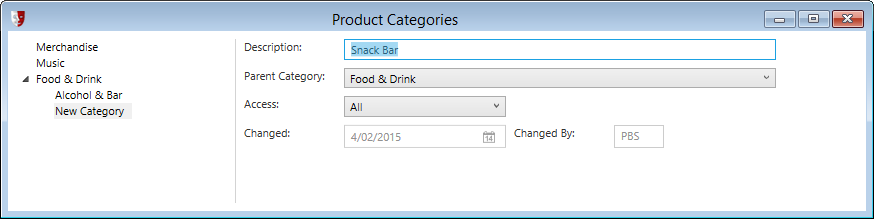
Alternatively, you can use the Parent Category field to create sub-categories for your products. Here we are in the process of adding a series of sub-categories including Snack Bar and Alcohol & Bar to top-level Food & Drink category.
It is possible to continue adding additional category levels, with sub-sub-categories inside of sub-categories, should you require it.
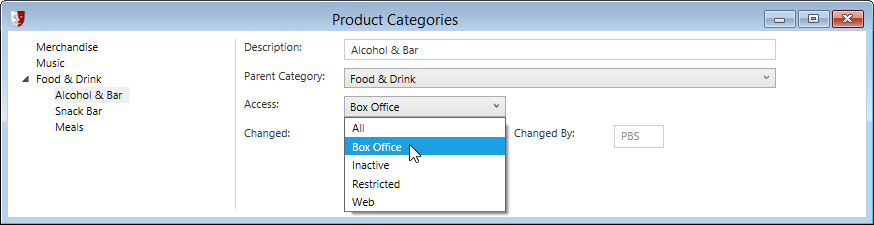
The other option for each product category in the list is the Access. Each product category or sub-category can be available for purchase at All points of sale, or limited to Box Office or Web. Inactive can be used for obsolete categories, and Restricted constrains the sale of products in the category to operators with restricted access permissions.
Listing Products For Sale
Products can be such items as programmes, vouchers, or merchandise. Products can also include services and fees, such as room rental and booking fees.
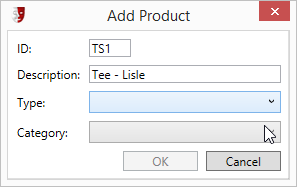
To add products to the system, select Setup > Sales > Products in Administration, then click the New button in the toolbar.
In the Add Product window, give the new item a unique ID code and a useful Description. Next, select the appropriate Type and Category from the dropdown lists.
The new product will be added to the Products list. In the Details tab on the right, fill in applicable information for the new product.
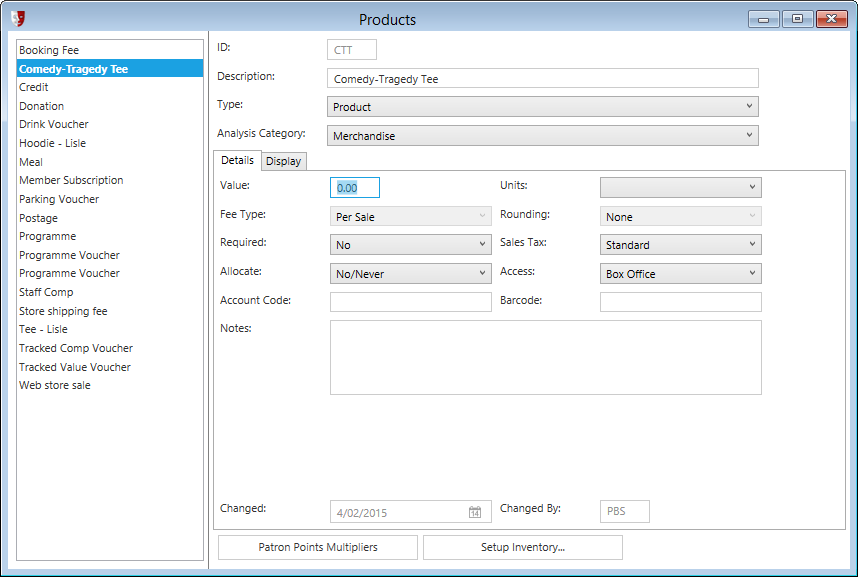
Identify the product in the Description field.
The Type field lets you identify the type of the product, allowing you to differentiate between products, services, fees, vouchers, and so on. The specific list of product types available is up to you, and can be configured in Administration by selecting Setup > System > Product Types.
The Analysis Category is a list of the product categories and sub-categories as defined in Setup > Sales > Product Categories.
Next, complete the Details tab for the new product.
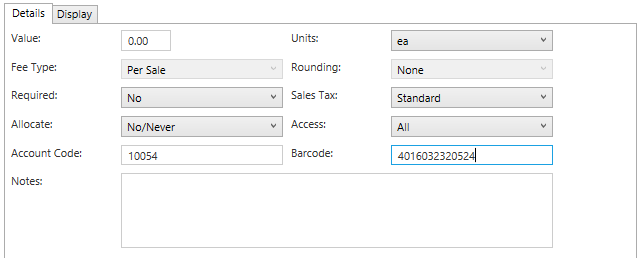
Value is the sticker price for the product. Fill this in for vouchers, donations, services, or anything that is not Inventory managed. Prices for Inventory items will be specified elsewhere.
Units is a list of options identifying the units of sale. The options available can be configured in Administration by selecting Setup > Sales > Units of Measure.
Fee Type is relevant for product types that are fees, and the options are Per Sale or Percentage.
Rounding is usually fixed at None for most product types.
Required allows a fee to be levied for each sale, such as a booking fee. Select between No and Yes options.
Sales Tax permits selection between the various levels of sales tax available. Ensure that you have the appropriate options defined for your location in Administration under Setup > Sales > GST Rates. If different rates for GST or VAT are applicable for different types of products or services, make sure you have selected the correct sales tax rate for the product.
Access allows the product to be available for purchase at All points of sale, or limited to Box Office or Web. Inactive can be used for obsolete products, and Restricted constrains the sale of products to operators with restricted access permissions.
Account Code associates the product with the account code used within your accounting system.
Barcode contains the number that corresponds to the barcode on the product. This may be the barcode provided on the product by your supplier, or a barcode you are adding to the product. You can either enter the barcode number manually, or while the text entry cursor is inside the Barcode field, scan an exemplar barcode and the field will be automatically completed. Fill this in for any product that is not Inventory managed. Barcodes for Inventory items will be specified elsewhere.
Target is accessible for donation type products, and is used to specify a target amount for a donation campaign.
Notes is a place for you to make any additional notes or comment about the product that might be useful to someone making changes to the product details in the future. If you are using QuickPOS, providing a note for a product will result in a small blue info icon being added to the product tile, and when this info icon is selected, the Note will be displayed.
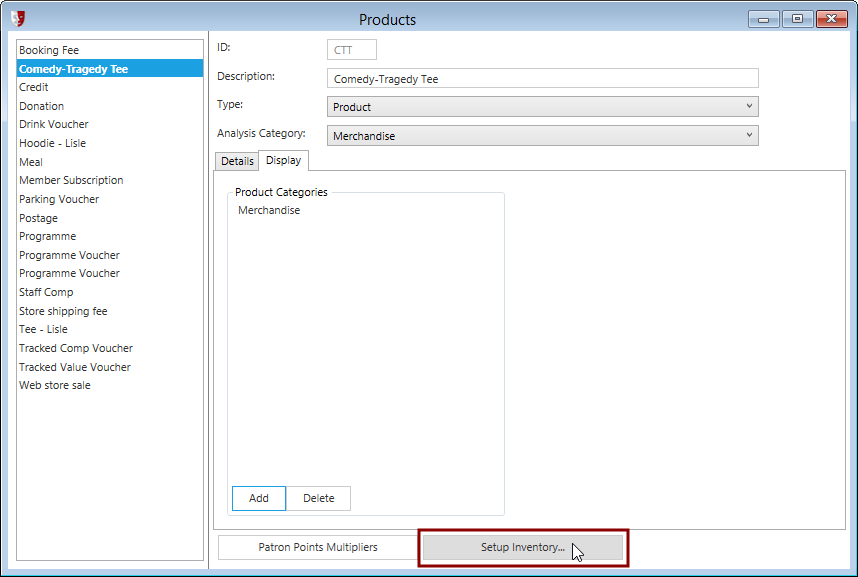
Next, check out the Display tab.
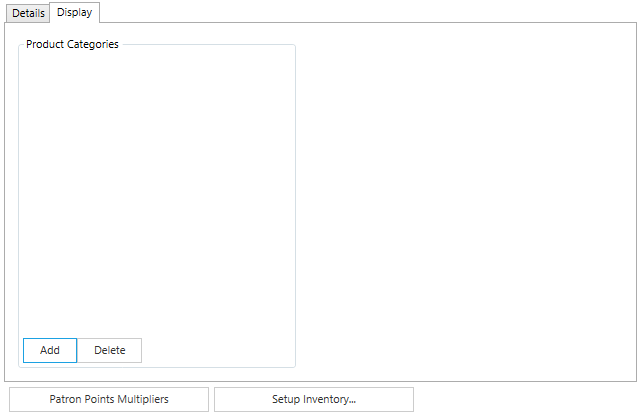
Although we have already made a selection for the Analysis Category above, here we can list multiple Product Categories for the product. This may make it easier to find the product in QuickPOS. Imagine Walker’s Crisps are sold at both the candy concession stand and in the lounge bar. It would be awkward for lounge bar staff to have to repeatedly navigate to the Snack Bar category every time someone wanted a packet of chips with their pint. By also putting the product in the Alcohol and Bar product category, staff will easily be able to add the product to the patron’s bill.
There is some redundancy here between the Product Categories list and the Category field above the tabs. This will be resolved as the Inventory system is refined.
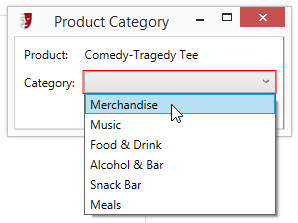
For each product category we want to add, we will click the Add button at the bottom of the Product Categories list. Select an option from the Category drop-down list.
For many products, the task of defining the product is now complete. If a product is to be managed by Inventory, some further details are necessary. In this case, click the Setup Inventory button at the bottom of the screen.
A series of new tabs will be added to the product details.
The first tab is the Inventory Detail tab.
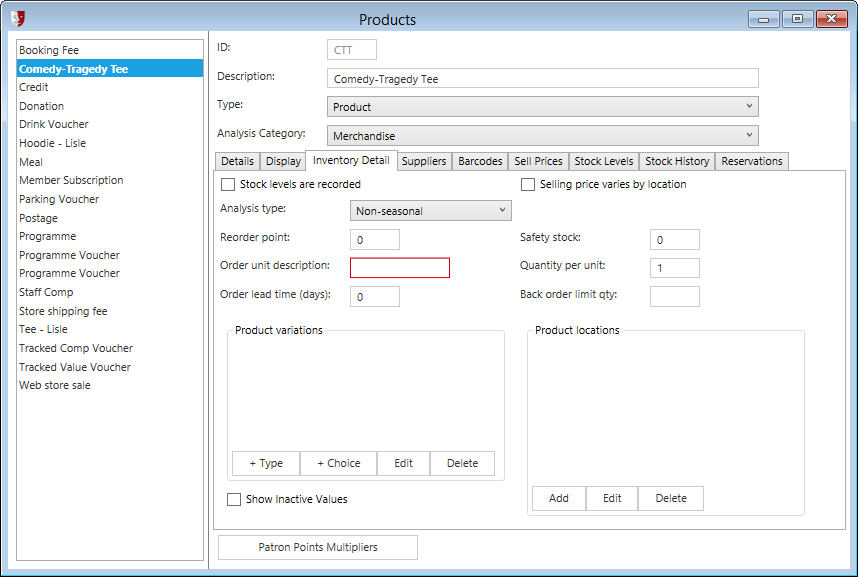
Stock levels are recorded is a checkbox to tell Inventory if it should track quantities of the product.
Selling price varies by location is ticked if the same product carries a different sell price at different sales points.
Analysis type allows selection from the options specified in Administration at Setup > Inventory > Financial Types. This may be useful for financial reporting breakdowns.
Reorder point is the quantity at which an order is triggered to restock the product. This should be the Safety stock plus the quantity that is likely to sell during the Order lead time. Initially, this may need to be a guess, but the number can be refined over time when the rate of sales can be determined.
Safety stock is the minimum acceptable quantity for an item. This will normally be set at a level to ensure that no sales are lost because of zero stock, even if sales are somewhat stronger than normal during the Order lead time. Again, initially this may need to be a guess, but a statistical analysis of historic sales can help determine a suitable value.
Order unit description describes the units used when ordering a product. It may be sold at retail as single units, but it may be ordered from a supplier by the carton, crate, box, barrel, or some other aggregation. Enter the description of the order unit.
Quantity per unit specifies how many product units are in an order unit. If t-shirts are ordered by the carton, and a carton of t-shirts contains 20 individual t-shirts, the Quantity per unit would be 20.
Order lead time (days) identifies how long it will take a new order to be received. Initially you can use service claims provided by your suppliers, but historical data can be used for greater accuracy.
Back order limit qty can be used to constrain repeat orders from being issued when existing orders are still pending.
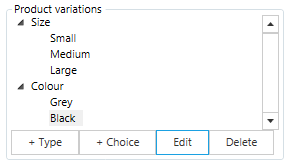
Below these settings is found the Product variations box. Here we specify different variations found in the product. This is useful for products that come in different sizes or colours.
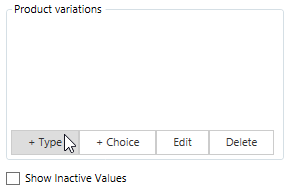
Click the Type button to add a new variation type. When the Product Variation Type window appears, enter a description for the variation in the Variation field.

If each variant can have a different price, tick the box Selling price varies for each variation value.
If the variation relates to a measure of quantity, for example when beer is sold by the pint and by the 12oz glass, tick the box This variation is a measure of quantity.
Click OK, then make sure the newly added product variation is selected in the list. To specify the different variants available for the new product variation type, click the Choice button.
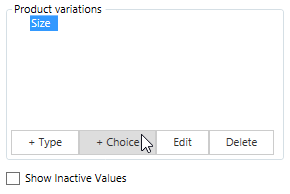
When the Product Variation Choice window appears, enter a description for the choice in the Description field, and a short reference code in the Code field.
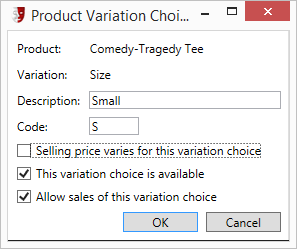
Tick the box Selling price varies for this variation choice if this choice will be sold at a different price from other choices.
Tick the box This variation choice is available if the item is still stocked or available from suppliers.
Tick the box Allow sales of this variation choice to make the item available for purchase at the various points of sale.
Click OK to complete the definition of the variation choice, and repeat the process for each choice available in this variation type.
If there is another type of variation available for the product, it can also have its Type and Choice options added to the list.
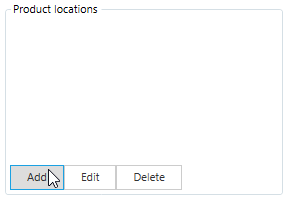
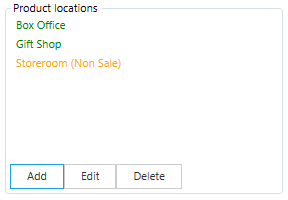
Next to the Product variations box is the Product locations box. This is where all the stockpoints are listed for the product. To add a new stockpoint location, click the Add button.
When the Product Location window appears, select a stockpoint from the Location list. This list of locations is defined in Administration by selecting Setup > Inventory > Locations.

Tick the Allow sales from this location if the stockpoint is also a point of sale. If the product location is a storage facility, this would be unticked.
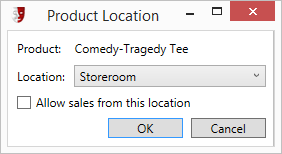
Click OK and repeat to add more Product locations to the list.
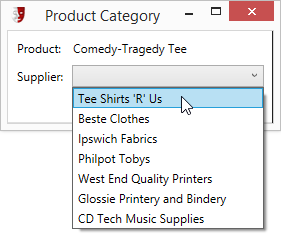
The Suppliers tab is the next tab for the product details. For each supplier of the product, click the Add... button and select a supplier from the list.
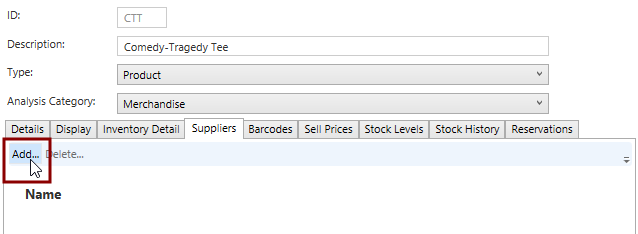
The suppliers list you select from is created in Administration by selecting Setup > Inventory > Suppliers.
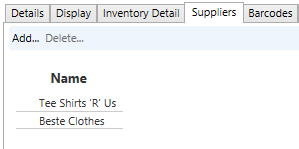
List each of the suppliers for the product you are detailing.
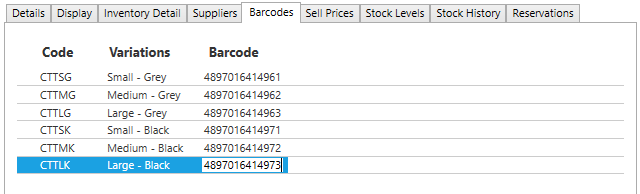
Next, select the Barcodes tab and specify a barcode number for each of the product variants. This will allow the product to be scanned and identified using a barcode reader at points of sale.
Click in the cell below the Barcode column header in the table, next to the item in the Variations list you are going to identify. This cell will contain the number that corresponds to the barcode on the product. This may be the barcode provided on the product by your supplier, or a barcode you are adding to the product. You can either enter the barcode number manually, or while the text entry cursor is inside the Barcode field, scan an exemplar barcode and the field will be automatically completed.
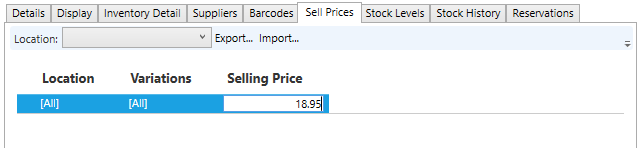
The Sell Prices tab is where you detail the prices for a product managed in Inventory.
If you have earlier identified that product variation types and choices are sold at different prices, then there will be a matrix of variations that need to have the price for each specified.
If you have earlier identified that a product is sold at different prices in different locations, you will need to fill out prices for each location identified in the Location field above the table.
For each variation listed in the Sell Prices table(s), enter the Selling Price for the variation and location. Here is a simple example showing what the table will look like if all locations and variations are sold at the same price:
To learn about the other tabs in the Products window, see Maintaining Inventory Records below.
Maintaining Inventory Records
The following sections detail the activities that keep Inventory up-to-date and provide status and auditing information.
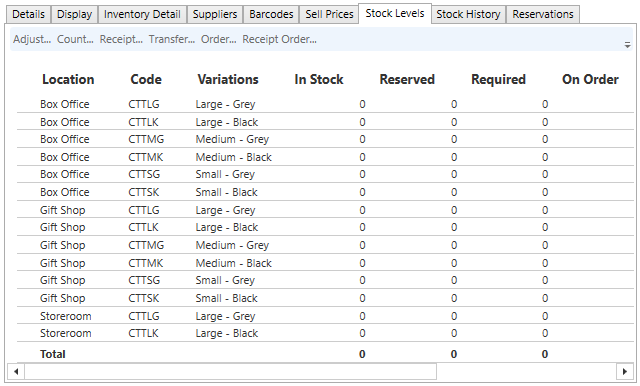
Adjusting Stock Levels
The Stock Levels tab is important for managing stock quantities. It lists all the product variations and the possible stockpoints.
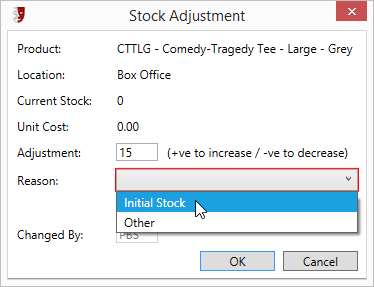
When you are first setting up Inventory and have existing stock to enter, or if you need to correct stock levels for a reason such as stock being written off, you will need to adjust the quantity of stock in Inventory. Select an entry in the table and click the Adjust... button.

In the Adjustment field, enter the correction that is required. If Inventory has fewer items on record than are actually on hand, enter a positive number to make the right correction. If Inventory has more items on record than are available for sale, enter a negative number to correct the Inventory record. When entering existing stock levels when setting up Inventory, this means we enter the number of items on hand.
There is a Reason field with options to select. The options are customised in Administration at Setup > Inventory > Transaction Reasons. Examples could include Initial Stock and Write-offs. Depending on how the transaction reason has been specified, you may also be required to enter a comment further explaining the stock adjustment. For example, if Write-offs requires a comment when selected, "shop soiled" might be entered to explain the correction.
Another occasion when stock counts need to be corrected is during a stocktake. Instead of hand-calculating the necessary stock adjustments and using the Adjust... button described above, select a product variation and location and click the Count... button.
Enter the New Count for the product variant, and select a Reason from the list. The options are customised in Administration at Setp > Inventory > Transaction Reasons. An example reason might be Stocktake. Depending on how the transaction reason has been specified, you may also be required to enter a comment.

Recording the Receipt of Goods
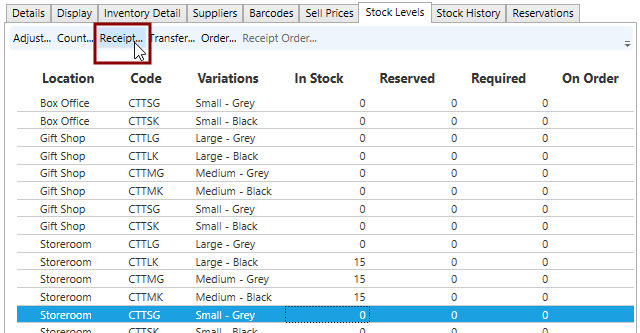
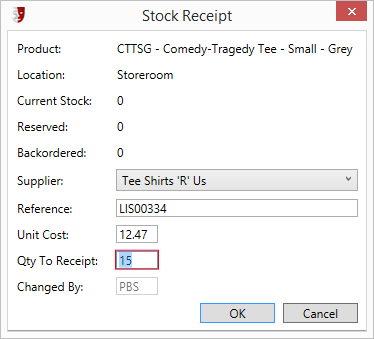
When shipments arrive from a supplier, enter the shipment quantities into Inventory. Click the Receipt... button.
In the Stock Receipt window, select the Supplier of the shipment from the list of options. Enter the shipment Reference from the consignment slip, correct the Unit Cost if necessary, and enter the Qty to Receipt. Make sure you enter the number of product items, not the number of shipping units. If three packets of t-shirts arrive, and each packet holds five t-shirts, the consignment slip may specify 3 packets, but Inventory needs to be told about 15 t-shirts being entered into the system. In this case, 15 would be the correct number to enter.
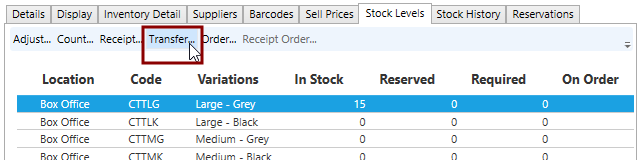
Transferring Stock Between Inventory Locations
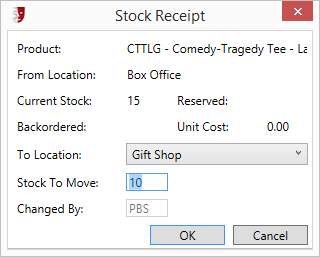
Transferring stock between inventory locations is necessary when moving stock from storage to sale locations, or when one sale location requires an item in stock at another sale location. Select a product variation at the location you are moving products from, and click the Transfer... button.
Select the To Location that will be the destination for the transferred items, and the quantity of Stock To Move.
Ordering Stock
When your inventory reports inform you that stock levels have reached or fallen below the Reorder point, find the product and in the Stock Levels tab, select the Order... button.
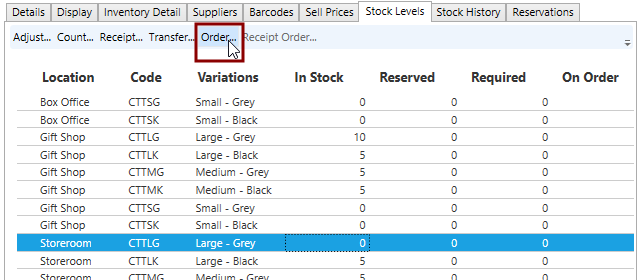
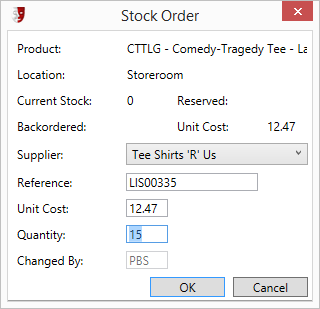
In the Stock Order window, enter the same details as you are entering into the purchase order to the supplier. Select the Supplier you are using from the list, enter the order Reference number or code, correct the Unit Cost if this has changed, and specify the Quantity being ordered.
Checking Stock Levels
To check stock levels, open the Products window in Administration by opening Setup > Sales > Products. Open the Stock Levels tab.
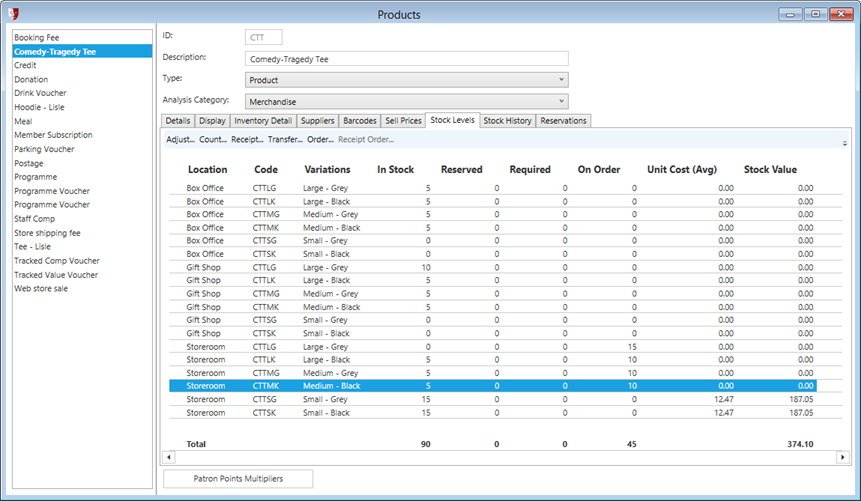
Click a column header to change the column the table is sorted by. Clicking again will reverse the sort order.
Inspecting Stock History
To see an audit trail of Inventory transactions for any product, open the Products window in Administration by opening Setup > Sales > Products. Open the Stock History tab. The Stock History tab will display a list of all the adjustments, corrections, orders, and sales for each product variation and location.
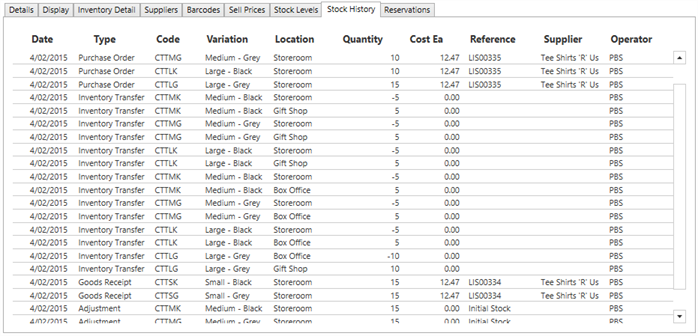
Click a column header to change the column the table is sorted by. Clicking again will reverse the sort order.
Sales Tax (VAT/GST/IVA) Rates
PatronBase supports having multiple Sales Tax rates and those rates can be applied to tickets and/or Products
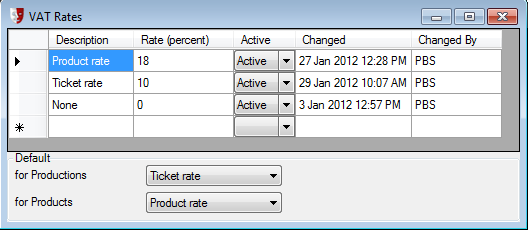
Descriptions and rates can be edited or added at anytime.
Seat Statuses
Setup>Sales> Seat Statuses will display the following:
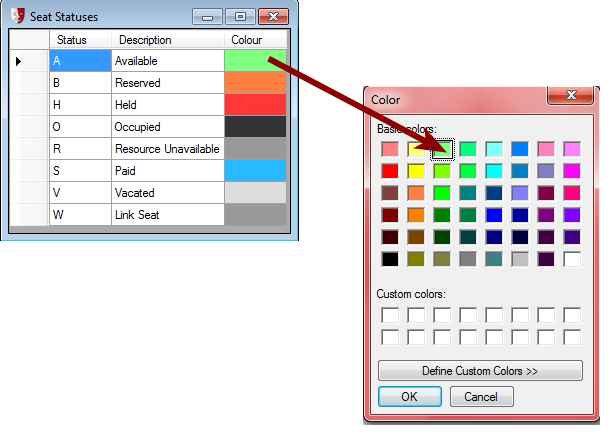
{Clicking} on a colour will bring up a Palette selector to choose a colour from.