Creating a New Layout Template
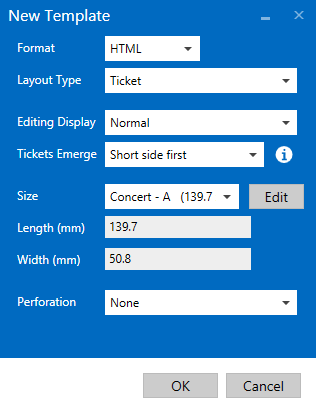
To create a new layout template, select New when the Layout Designer launches or select New from the File menu. The New Template window will appear:
All template settings can be changed once the template has been created by selecting Template Properties from the EDIT menu.
First, choose the layout Format required for your ticket printer. Two formats are supported, HTML and FGL. When you select FGL, you can choose between 200dpi and 300dpi. Although you can change the Format, it is important to set the right format before adding too many elements to the ticket as the styles available depend on the Format.
Next, select the Layout Type from the list of standard items printed on ticket stock:
- Ticket
- Address Label
- Voucher
- Receipt
- Card Receipt (Customer Copy/Merchant Copy/Declined)
- Sale Summary
- Member Card
- Stub
The dynamic fields that can be added to a layout are dependent on the Layout Type. See Dynamic Field Options by Layout Type for information on the fields available.
The Editing Display can be Normal or Rotated 90°. This setting does not affect how the ticket is exported; it is simply the orientation of the layout on the design canvas. The Tickets Emerge setting, however, does affect how the ticket is exported. Select Short side first or Long side first:

Next, select the Size from the list of standard sizes. If your ticket stock size is not listed, select Custom and then enter the dimensions in the Length and Width fields, in millimetres.
Finally, select whether or not the ticket has a Perforation. Once you select Left or Right, you can enter the Distance from the edge of the ticket, in millimetres.
Click OK to create the layout template, which will be displayed in the main window.
To change any of these settings once you have created the template, select Template Properties from the EDIT menu.
