Checking Availability for Venue
One of the key features of the Venue Manager is to present visual representations of the bookings to make it easy to visualise what venues are booked, when. Three views are provided: Day View, Time Line, and Calendar.
Using the Day View
Select Bookings > Day View. Select the day to display using the calendar date picker on the top left of the window. Note that today’s date has a blue box around it and the date selected for display is highlighted. The selected date is also in large characters at the top centre of the window.
Below the calendar date picker is an expandable tree of Venue Groups and Venues. Double-click a Venue Group to expand it to see its Venues, or to collapse it to hide its Venues. Tick a Venue if you want its bookings to appear in the Day View. Tick a Venue Group if you want all the venues in the group to appear in the Day View.
In the main part of the Day View, each selected Venue appears as a column, with time along the lefthand side.
Bookings will appear in different colours according to the Booking Statuses. For more information see Defining Booking Statuses.
Double-click a booking to open the booking window for that booking.

The background of the Day View indicates the opening hours. Right-click on the background to change the colour used to represent the working and non-working hours.

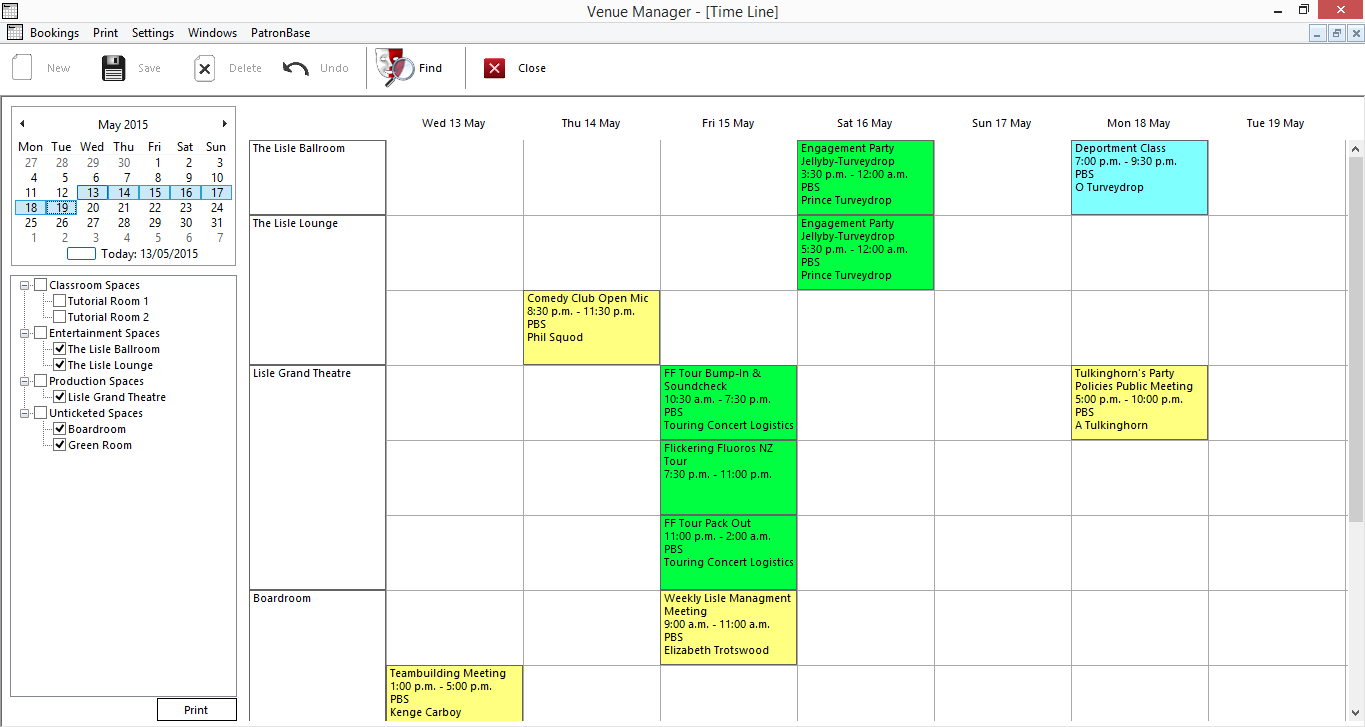
Using the Time Line
Select Bookings > Time Line. Select the days to display using the calendar date picker on the top left of the window. More than one day can be selected by clicking and dragging in the calendar.
Below the calendar date picker is an expandable tree of Venue Groups and Venues. Double-click a Venue Group to expand it to see its Venues, or to collapse it to hide its Venues. Tick a Venue if you want its bookings to appear in the Time Line. Tick a Venue Group if you want all the venues in the group to appear in the Time Line. The venues you select will be remembered, so the next time you log into Venue Manager, the same venues will be selected. The system remembers the details for each operator, so if a different operator logs on using the same computer, they will see the venues they selected.
In the main part of the Time Line, each selected day will appear as a column. Selected Venues appear as rows, with the names of the venues in the row headers at the left. A Venue may have several rows, if there are several bookings to display in the selected time period.
If there is a booking for a venue within the selected date range, it will appear as a coloured box that lines up with the date of the booking and the venue row. Summary details of the booking appear inside the box. Bookings will appear in different colours according to the Booking Statuses. For more information, see Defining Booking Statuses.
Double-click a booking to open the booking window for that booking.
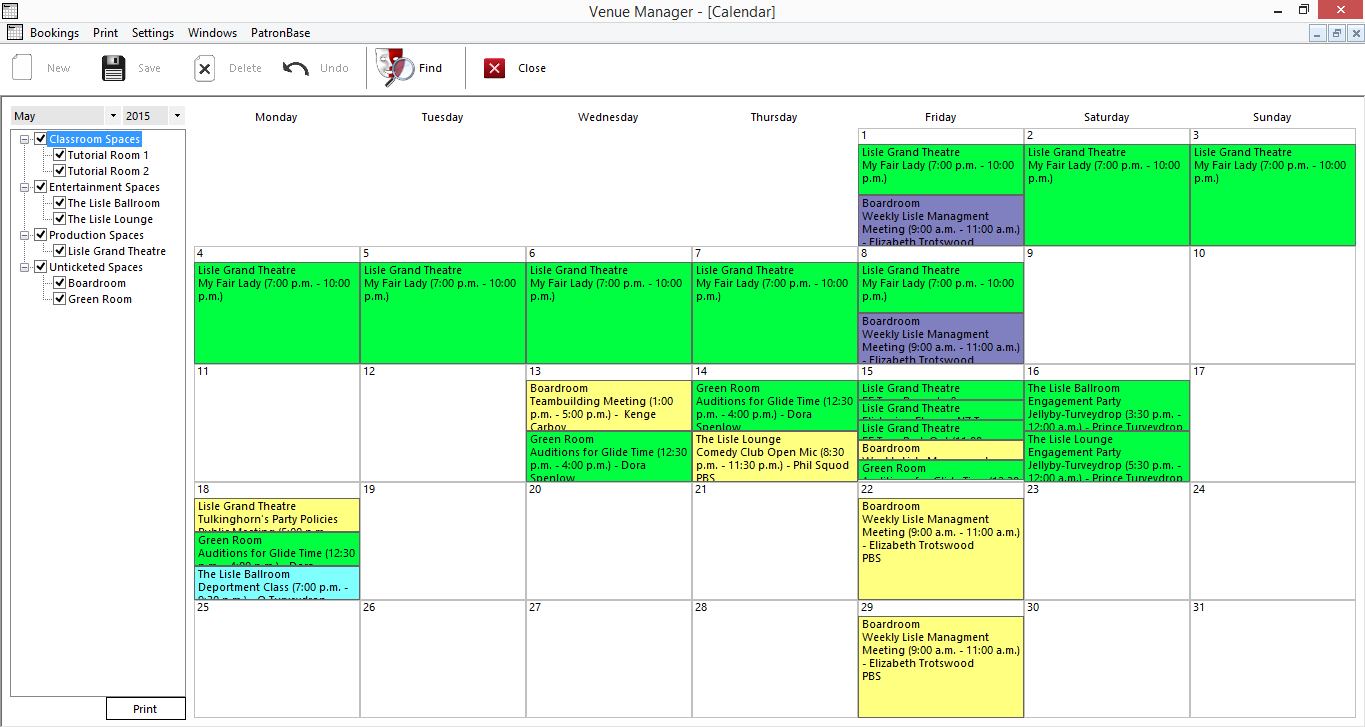
Using the Calendar
Select Bookings > Calendar. Select the month and year to display using the dropdown lists on the top left of the window.
Below the month and year selectors is an expandable tree of Venue Groups and Venues. Double-click a Venue Group to expand it to see its Venues, or to collapse it to hide its Venues. Tick a Venue if you want its bookings to appear in the Calendar. Tick a Venue Group if you want all the venues in the group to appear in the Calendar.
In the main part of the Calendar, a grid displays a traditional calendar month view. Any day that features a booking will have a coloured box filled with summary details for the booking, including the venue name. If there are several bookings on that day, the day will be divided into strips, one for each booking.
From the Calendar View, you can open a Day View for a specific day by double-clicking the date line. As you bring the mouse pointer over the date line at the top of the box for a particular day, a coloured selection box will appear. Double-click anywhere in this box, and the Day View for that day will open.

Bookings will appear in different colours according to the Booking Statuses. For more information see Defining Booking Statuses. When you print the Calendar View, these status colours will also appear on the printout.
Double-click a booking to open the booking window for that booking.
The Calendar view can show events such as public/bank holidays and school holiday or term dates. Right click on the calendar view, and select Events from the pop-up menu.

In the Events window, you can add and edit Event categories and Events.
When you Add or Edit an Event Category, you can supply a Description for the type of event, and select a colour that will be used on the Calendar to highlight events in that category.

You can also Add or Edit a specific Event. When you select one of these buttons, select a Category for the event from those you have already created. Provide a Description to name the event. Specify the Starting and Ending dates. These can span multiple dates, so long events such as term dates can be identified. The Yearly checkbox is useful to identify events that recur annually on the same day. Do not use this for annual events that fall on different days each year, such as Easter holidays or Mondayised holidays.

Days featuring Events you have created will be highlighted with a header strip of the colour you chose. Hover your mouse over the colour strip, and a tool tip will identify the Event Category and the Event Description.

When more than one event is scheduled for a particular day, the header strip may feature multiple event category colours, and the tooltip will list all the events for the day. Here, a public holiday has been scheduled for 25 April 2016, which falls within a two-week school holiday period.
