Setting Up the Organisation
One of the initial steps in setting up your PatronBase installation is to customise and configure information and settings relating to your organisation. This is largely done from the Setup> Organisation menu in Administration. While these settings are important initial setup details, they generally only need to be set once and then left alone. However, they can be edited at any time if required.
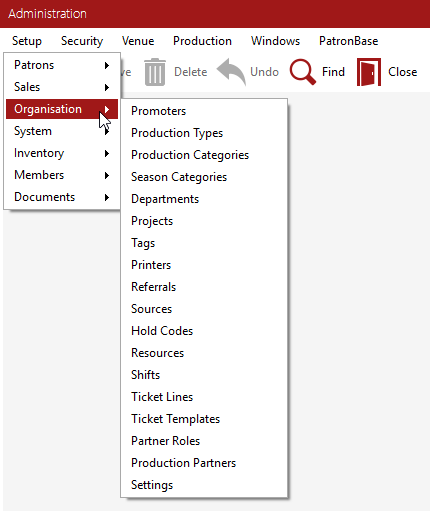
One step to take before configuring Setup > Organisation settings is defining States/Towns/Post Codes as these may be used in other places while setting up your organisation. This may have already been set up for you.
System Settings
The System Settings window is divided into three tabs: Company, Defaults and Properties:
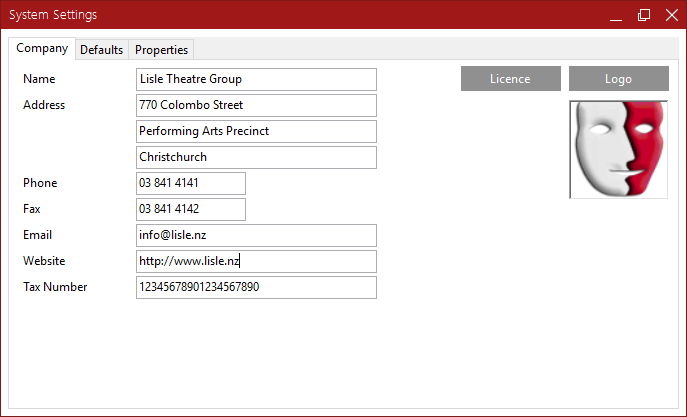
Company
Customise your organisation details as appropriate.
The address details will be used as the default pick-up address for collection of tickets sold viat the Web.
Tax Number will be used on system generated receipts.
Click the Licence button to enter your Organisation Name and Licence key.
You can customise reports with your own logo by clicking the Logo button and using the file navigation window to select a new BMP file.
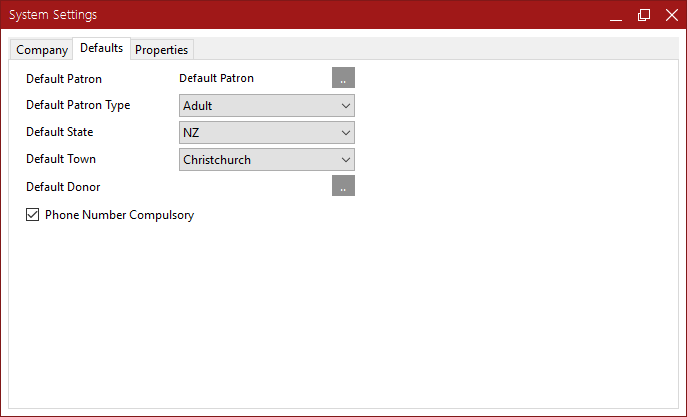
Defaults
The Defaults tab provides for some initial settings used elsewhere in the PatronBase system, or details used when using Fast Ticketing.
The Default Patron is used in Fast Ticketing, when the patron's details are not being requested and collected. It is also used as a stand-in instead of using actual patron details in other transactions. Initially, you will find a patron with the name "Default Patron", but you can customise this if you wish. Click the .. button and use the Find patron window to select an existing patron or create a new one. To learn more about finding and creating patrons, see Find a Patron.
The Default Patron Type will be used when using Fast Ticketing to make an assumption about the appropriate Book Type. Make sure you choose the most likely option to reduce the number of changes you need to make when Fast Ticketing. If you have not set up Patron Types, the provided options may not suit you. You can skip this setting for now and come back to it when you have created Patron Types.
The Default State and Default Town settings will be used to save you entering the same information over and over again when creating patrons.
Default Donor can be used to accept anonymous donations. You may choose to use the Default Patron, or you may choose to create a special anonymous patron account. Click the .. button and use the Find patron window to select an existing patron or create a new one. To learn more about finding and creating patrons, see Find a Patron.
As an organisation, you need to decide on the minimum information you will use when creating a patron. If a name is sufficient, you may choose to untick Phone Number Compulsory and patrons can be created without this personal detail being recorded. This may be important in jurisdictions with strict privacy and personal data collection laws. Alternatively, if your organisation only wishes to collect patron details from patrons who wish to be contacted, then ticking Phone Number Compulsory helps to ensure that basic contact information is obtained from a patron when an account is created.
Properties
You can safely skip these special settings initially. They provide control over some technical details and tweaks to the system, things than can customise PatronBase to your needs. Before making changes to these settings, discuss your needs with your PatronBase agent, as they will be able to advise you on the best options to use.
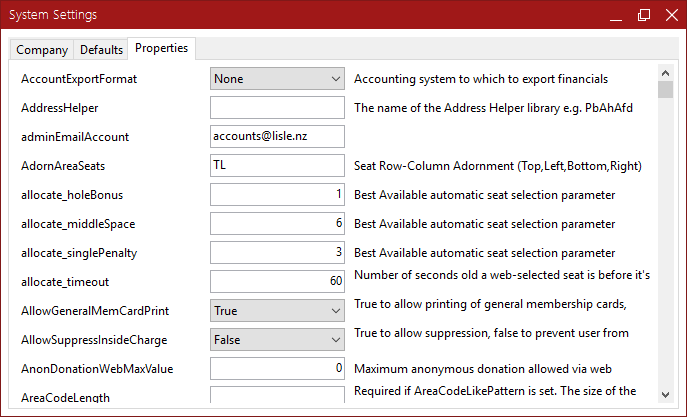
A list of what each of the settings is for is included in Appendix 1: System Properties. To give you a flavour of the potential here, some of the more commonly changed settings include:
- The local term for sales tax, eg VAT or GST
- Selection of the initial view when opening Box Office
- Replacement terms for: "Brochure", "Complimentaries", "Paid", "Patrons", "Performances", "Productions", "Seasons", "Subscriber", "Seats", "Supporter", "Venue"
- The default payment type for use in fast transactions
- The display date format
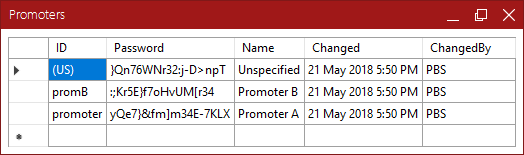
Promoters
Promoters are third-party organisations that are data-sharing partners. When associated with a production, they can use their special promoter login credentials and the special online promoter link to access sales data. You only need to set up Promoters if you are sharing data with a third-party organisation.
In Administration, select Setup > Organisation > Promoters.
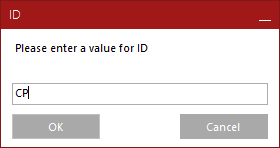
To add a new Promoter, click the * to the left of the empty row at the bottom of the table. You will be prompted for a unique ID for the promoter:
You are then asked for a Password for this new promoter. Please use a good password generator to create the password.

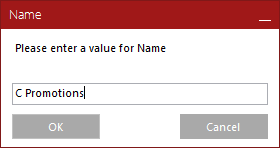
Supply a recognisable Name for the new promoter:
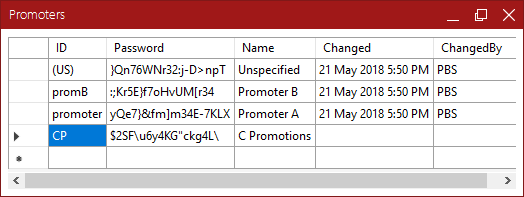
When you click OK, the new promoter is added to the existing list:
You can also edit existing promoters. Once created, the ID cannot be altered, but you can select and edit the Password and Name cells in the promoter table.
Click the Save button in the toolbar to save your changes. Your changes will be timestamped in the Changed column and your operator ID will be logged in the ChangedBy column.
Adding Production Types, Production Categories, Projects and Departments
Before the details of any given Production are filled in there are options that can be optionally completed. These are the Production Types, Production Categories, Departments and Projects.
Production Type and Production Category can be used to analyse the productions mounted as well as the Types or Categories of production pattern that any particular patron favoured.
An example of how these could be used could be that the Type could be used to indicate a Comedy; Drama; Musical or such like. The Category could then be used as a further form of analysis, such as Outside Production or Joint Venture, all of which could be of a certain Type such as Comedy.
Production Types
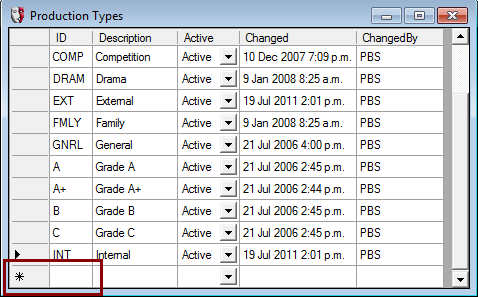
Selecting the * row allows adding a new Production Type.
Production Categories
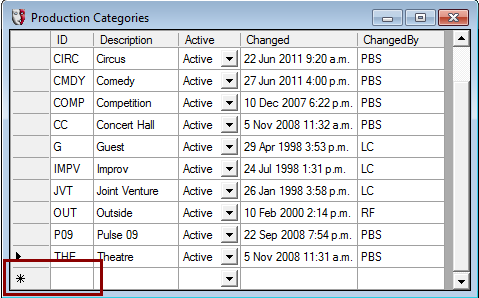
Selecting the * row allows adding a new Production Category.
Departments

Selecting the * row allows adding a new Department .
Departments can be Active or Inactive. If they are Inactive, they will not appear on the dropdown list of options in the Production Details.
Projects
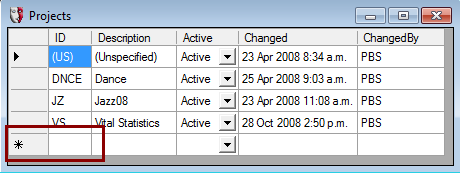
Selecting the * row allows adding a new Production Project.
Projects can be Active or Inactive. If they are Inactive, they will not appear on the dropdown list of options in the Production Details.
Season Categories
Before creating seasons, optional Season Categories can be defined. Season Categories can be used to analyse the seasons produced. As examples, the Season Category may be used to organise seasons by genre (such as Symphony, Theatre, Opera...) or by other characterstics (such as In House, Joint Venture, External Development).
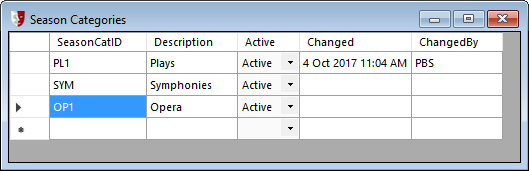
Selecting the * row allows adding a new Season Category. Season Categories can be Active or Inactive. If they are Inactive, they will not appear on the dropdown list of options in the Season Details.
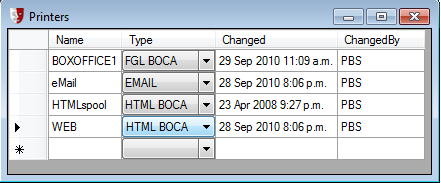
Printers
Tags
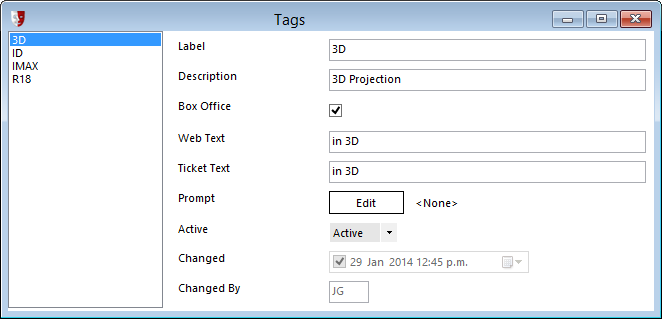
Tags are a way of flagging attributes of a performance to be made visible in the performances list next to the performance graphic. For example, a cinema may use a "3D" tag to identify screenings in 3D, and "MA15+", "R18" and similar tags to identify classification ratings on a movie.
Select Setup > Organisation > Tags from the Administration menu to view the Tags window.
Creating Tags
To add a new tag, click the New button in the toolbar.
You will be prompted for a Label. This is the tag that will appear in the Box Office performance list and in the Edit Performance window’s Tags tab.
Having clicked OK, you will then be asked for a Description. This briefly identifies the purpose of the new tag. Click OK again.
The Tags window will be shown with the new tag added to the list. Ensure the new tag is selected, and you have the opportunity to edit additional attributes of the new tag.
Box Office: This checkbox is used to specify whether or not the tag will appear next to the production name in the performance list next to the performance graphic in Box Office.
Web Text: This field specifies the text that will appear alongside the performance details when booking via the web.
Ticket Text: This field specifies the text that will appear in the {tags} field if it is added to a ticket line for printing on tickets.
Prompt: When enabled, a prompt will appear when an attempt is made to make a booking for a performance that has been given this tag. As an example of how a prompt may be used, if a tag is being used to flag a classification rating on a movie, a prompt can be used to pop up a window reminding the box office operator to check ID, and it can also be used to remind patrons booking on the web to bring suitable ID with them.
Click the Edit button to set up a prompt.

Tick the checkbox to enable the prompt. Fill in text boxes with the text you want to appear in the prompt. The Operator text will be used when the prompt appears in Box Office; the Patron text will appear when tickets are booked online.
Active: This dropdown list can be used to mark a tag as Inactive if it is no longer to be used, and otherwise should be Active. An obselete tag which has already been used cannot be deleted and can only be marked as inactive.
Referral Sources
Referral Sources allows for capturing the source of what may have triggered the sale at the time a Patron makes a purchase. It is setup to allow the quick selection of a preset source during the sale. Capturing the Referral source can be made 'required' in which case one will need to be selected for a sale to proceed; or not required, in which case they can be optionally selected at the time of the sale.
Creating Referral Sources
Referral sources occur at two levels: The system wide level and the Production level. Referral Sources must be setup at the System level to be available at a Production level, but not all system level referral sources need to be made available at a Production level.
Setting Up the System Wide Level
In order to be available, Referral Sources need to be first setup at a System wide level:
Setup > Organisation > Referrals
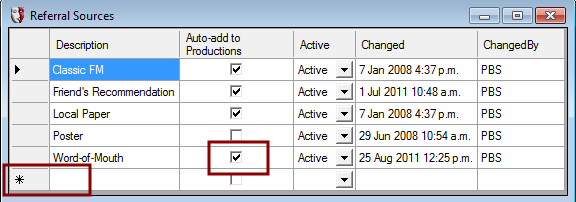
Selecting the * row allows adding a New Referral source.
By checking the 'Auto Add to Productions' Check-box it means that this Referral source will automatically be added as available to any Productions created in the system after this time.
The Active / Inactive is a method to remove the Referral source from being available to be selected at a later point for a Production, while retaining it in the system in case it had been used as a referral source for past sales.
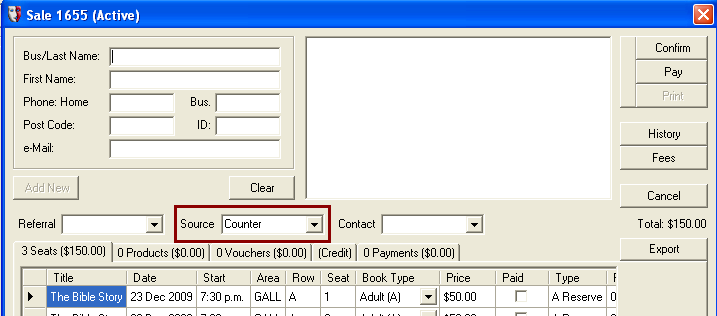
Sources
There are primarily 3 Booking Sources that the system comes with by default: Counter, Phone and Web. To change the description or where these are activated from use Setup > Organisation > Sources:
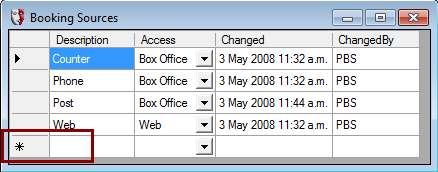
Selecting the * row allows adding a New Booking source.
These get activated on the Sale Form here:

Note only those 'Sources' that are set as active in the Box Office are available in the drop-down.
All Web Sales will automatically have the Booking Source set as 'Web'
Once it is set and sale is saved, the option greys out, so that it is unable to be changed, as below:

The next new Sale will retain the previous sale’s setting, and default to that. It can be changed, until the sale is confirmed.
Hold Codes
There are a variety of reasons seats are held, and Hold Codes let you categorise the seats you put on hold according to those reasons. Some seats may be reserved as 'House seats', or seats may be reserved for production staff, promotor or sponsor personnel or for theatrical reviewers. The preferred seats of season subscribers may also be a reason to hold seats. To edit Hold Codes you must have Edit Hold Code privileges on your account. See Operators for more information.
You can have as many hold codes as you like, according to the reasons seats are held for the house.
A typical example might look like this:
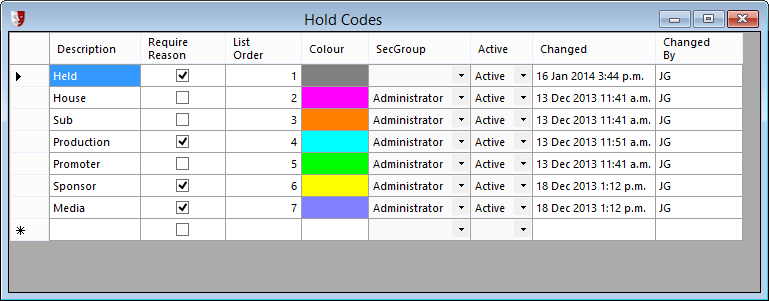
Creating New Hold Codes
In Administration, open the Hold Codes window by selecting Setup > Organisation > Hold Codes from the menu. Here you can edit existing Hold Codes or create a new hold code.
To create a new hold code, click the New button in the toolbar. A series of windows will prompt you for values for each of the columns in the table.
Description
Enter a short descriptive label for the new hold code category. This appears in lists where you need to select from the available Hold Codes.
List Order
This lets you specify where in the list of codes you would like the new code to appear. Adjust the List Order numbers for other Hold Codes as necessary if you would like a new code to appear between existing codes.
By default, when defining a venue and a block of seats is created, they will be assigned the first code in the list as the Default Hold Code. For convenience, give the first position in the list to the hold code that will be suit the majority of seats. Subsequently, you will only need to select the seats that will be reserved for special reasons and assign alternate Hold Codes to them.
Colour
Select a colour chip that will represent the hold code in the Performance Graphic when the Hold Code filter is selected. You can select from the Basic colors available or click the Define Custom Colors >> button to make a custom colour selection.
Once the new hold code is created, you can then change other settings for the new code:
Require Reason
Tick the Require Reason checkbox if you want the box office operator to enter an explanatory message when they click the Hold button on the performance graphic. Note that a reason is not required when seats are held when productions are being created or season subscriptions are set up, even if this checkbox is ticked.
SecGroup
Select the group of users that can release seats using the hold code. The security group must have the Hold/Release seats function assigned to the group. If the security group you want to select does not appear in the list, see Operators
Operators need to be set up for several reasons. Individual transactions require that an operator be associated with them, for audit purposes. Operators also need to be identified for security purposes, so as to allow access to different parts of the system depending on what Group they are a member of and the privileges that have been assigned to that group(s).
At least one operator needs to be Setup initially.

Using the [New] button on the toolbar, to create a New Operator:
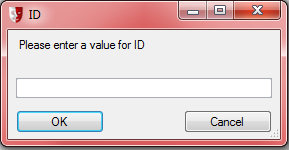
The 'ID' needs to be unique, in that each Operator requires a unique ID although their names could be the same. Usually the operator’s initials suffice.
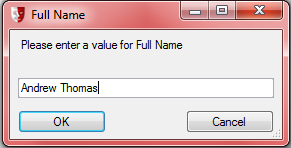
Then add their Full Name, and press [OK].
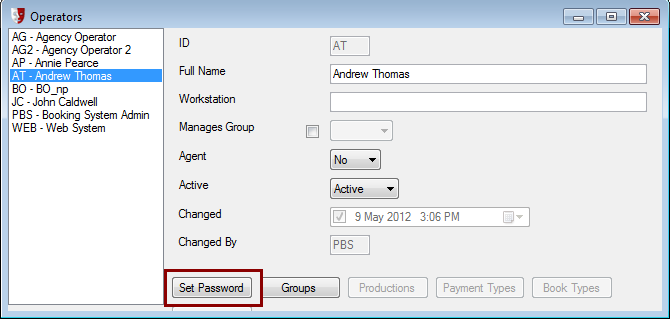
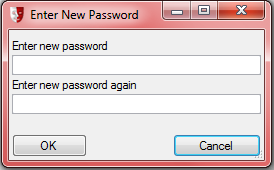
A 'Password' is required for all users. When it is typed in it will appear as a row of asterisks (******). The password is case-sensitive, which means that the same password but with a capital letter will be a different password as far as the system is concerned, so the user must remember what case is used.
The 'Workstation' field if filled in with a specific Machine name (as found in the Windows System attributes) will limit this Operator to only be able to login on that specific PC.
The 'Manages Group' field refers to any Membership Module group that is being managed by the system. When ticked the drop down will list all available Membership groups. An operator can only manage one Membership group at a time.

The 'Agent' Yes/No option refers to whether this Operator is accessing the system via the Agency Module, if set to Yes the [Agency] button becomes active:
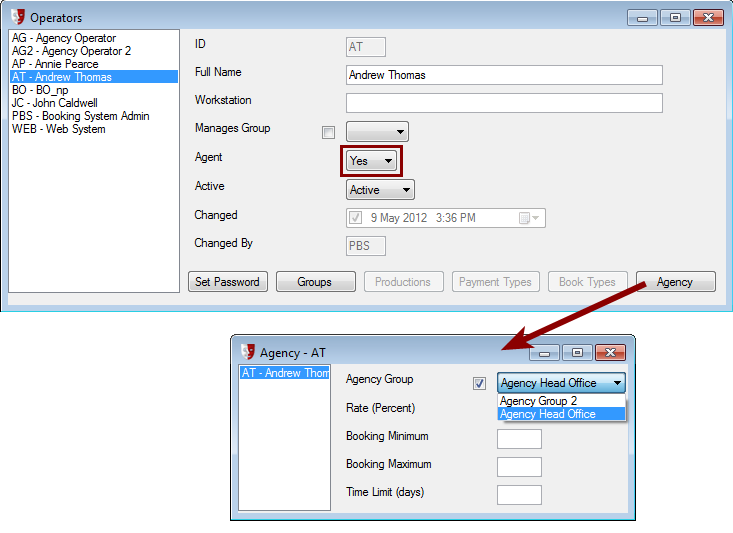
Select an Agency Group that this Operator is associated with, from the available list.
These groups are setup as below in Security>Agency Groups.
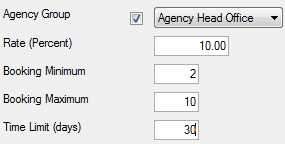
Once an Agency Group is selected, other constraints can be set, such as:
|
|
Percentage commission paid on Agency Sales Minimum number of tickets allowed to be sold Maximum number of tickets allowed to be sold How many days in advance of the performance that the Agent Operator can book tickets for |
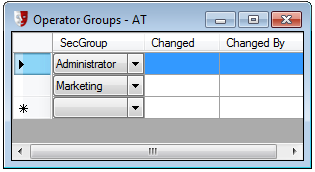
The 'Groups' button displays and can edit, what Security Group(s) and therefore what sort of access that this Operator has to the system, see below
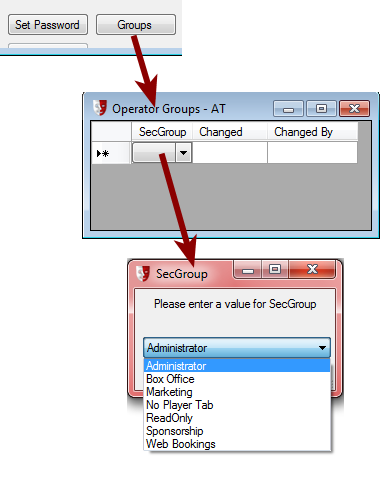
To delete a Security Group from an Operator, Highlight and use the [Delete] button on the toolbar; you will be asked to confirm that you want to delete the group.
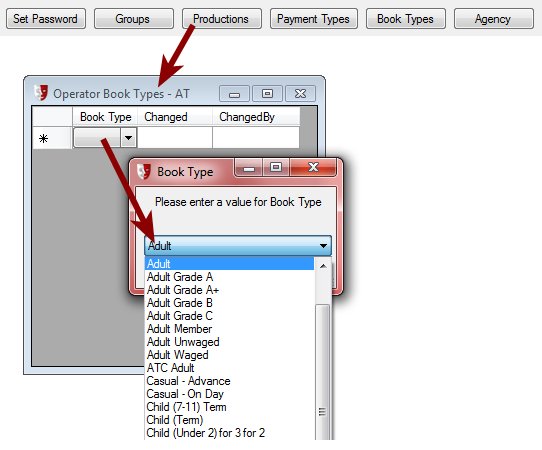
If any of the Security Groups that are associated with the Operator have Operator constraints then that restraint’s button will become active:
The Greyed Out buttons will become active once the associated Security privileges are activated for the Group that this Operator is a member of:

Security > Group Functions
|
|
Moved into the Read/Write list associated with that Security Group |
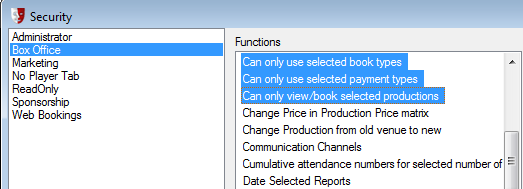
to add the Hold/Release seats privilege to that group.
Finally, click the Save button in the toolbar.
Removing Hold Codes
If a Hold Code is not already in use in the system, for instance if it has only just been created but is in fact not needed, then simply select the row by clicking somewhere in the row, then click the Delete button in the toolbar.
This will not work if the code is already in use in the system, however. You will see an error saying: "This item is still in use." To mark such a code as obsolete and no longer to be used, change the option in the Active column from Active to Inactive.
Resources
TBA
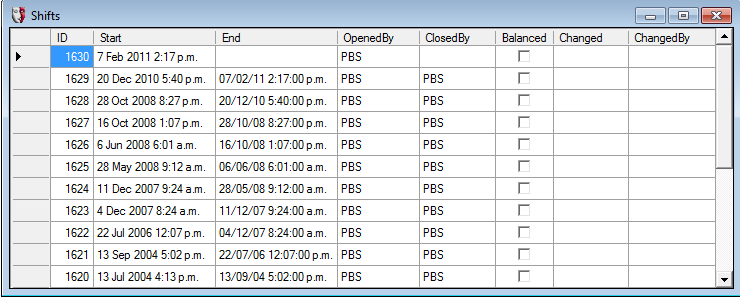
Shifts
This form is also where the shift can be flagged as Balanced or not.
Ticket Lines
The Font and position on the ticket are currently not available for editing via the system, however what appears on each line is what is decided by the Ticket Line Template.

To add to each line highlight by clicking on and the 'Insert Field' offer a drop-down of variables that can be looked up from the system:
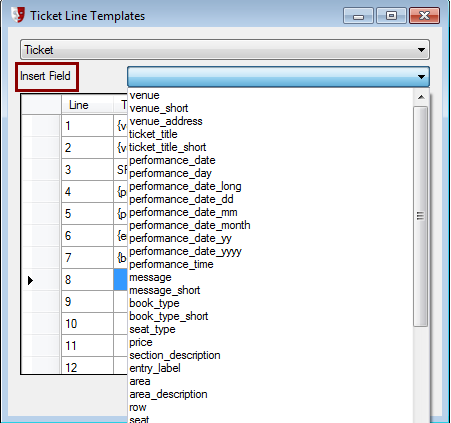
Multiple selections can be entered on each row, by using the arrow keys to move left or right along the row, and selecting a field from the drop down list.
Free form text can also be entered directly into the line, as in example above on line 3.
A complete list of variables available can be found in Appendix 3: Ticket Line Template Options.
Other Layouts
There are several other layouts that are printed through the ticket printer that can also be designed via the System Ticket Line Templates, as illustrated below. Each layout has its own drop-down list of fields available to be selected from.
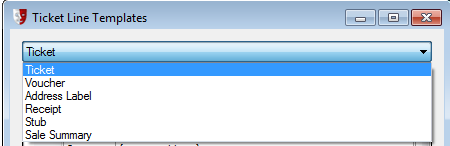
Each layout has a [Test] button which will send a sample ticket to the ticket printer.
Note: Remember to Save any changes using the Update Record button on the Toolbar, prior to using the [Test] button.
Inheritance
In keeping with the inheritance process within the system, Productions inherit attributes from the Venue and the Venue inherits the Ticket Line template from the system setup. Any Production created at a Venue will inherit the Ticket Line Template of that Venue, however once copied from the Venue, the [Tickets] button allows the Ticket Line Template to be edited and tailored for each Production in the Production Maintenance form.
At the Production level, this only applies to the Seat Ticket template; all other layouts are controlled from the System level.
System-Wide Templates
Address Labels printed on a ticket use the Template found at Setup > Organisation > Ticket Line templates.
This template in practice has a unique quality in that it will shuffle up lines if it has a ‘blank’ line in the address. This can cause issues such as the Postcode printing below the City as the {City} field may have been ‘shuffled’ up due to a blank row. This most often happens in addresses entered via the Web. If this is a likely situation, the answer is to put the last line, city and postcode all on the last line of the Template, as below:

In this situation, should the Address have a {line 3} entered, then that line will appear on the same row as the {city} and {postcode}. However, if a blank row is found in one of the three address lines they will all adjust by shuffling, and the City and Postcode will then appear on the same line.
Partner Roles
Partner Roles extends the previous support for identification of Promotors by allowing an organisation to identify other types of partners. A common type of partner in the cinema industry, for instance, is a Distributer. Rather than constrain partner roles to these two known roles, Partner Roles provides the flexibility to create additional roles that an organisation might need.
In Administration > Setup > Organisation > Partner Roles, the window will show you currently defined partner roles with a Code and a Name for each.
To add a new role, click the New button in the tool bar. The Add Partner Role window will provide you the option to provide a Code and Name for the new role.
Patrons that are partners of one sort or another can be associated with a Partner Role using the Production Partners window. For more information, see Production Partners.
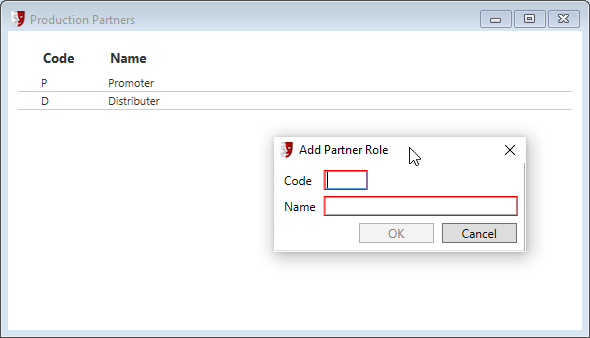
Production Partners
Production Partners is used to associate a patron with a Partner Role, such as a Distributer or Promotor. Set up a Production Partner for each organisation you share patron data with, so you can obtain appropriate data sharing consents from patrons.
Open Administration > Setup > Organisation > Production Partners to see a list of the current Production Partners.
To add a new partner, click the New button in the toolbar. The Find patron window will appear, and you will have the option to search for an existing patron or create a new one.
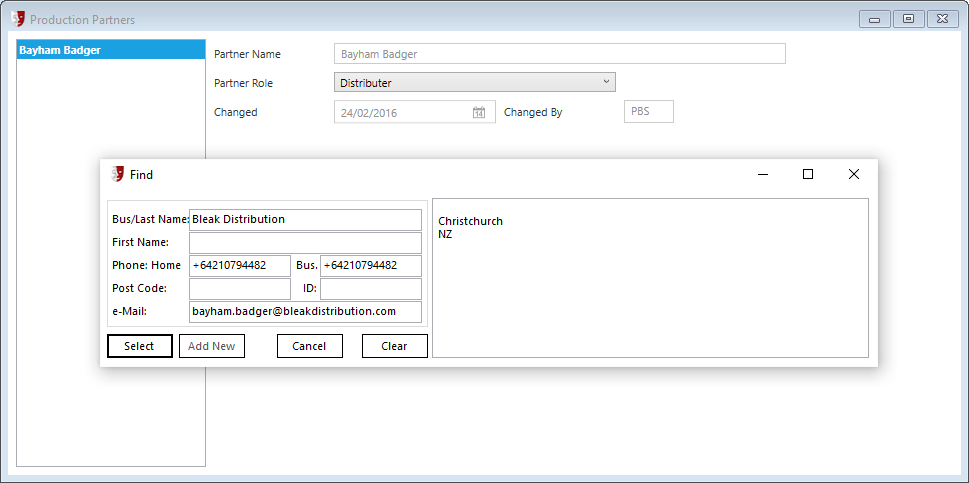
Specify a role for the selected patron from the options in the Partner Role dropdown. Partner Roles are defined in Admin > Setup > Organisation > Partner Roles. For more information see Partner Roles.