Updating Patron Details
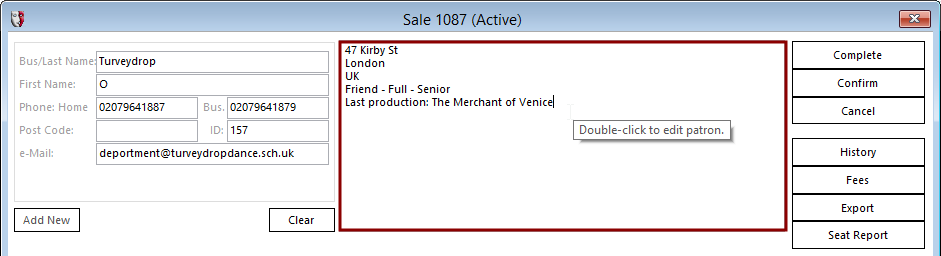
If you need to update a patron’s details while making a booking, simply double-click on the patron information panel:
If you don’t have a Sale window open, click the Find Patron button in the toolbar, and enter some details to get a short list of patrons. Double-click a patron to select them, then click the Select button to open the Patron window.
At the top of the window are the primary identification fields and some special action buttons.

There are fields for the First Name, Last Name, as well as a formal Salutation.
If the patron is a company, the option Company may be selected. If, on the other hand, the patron is a person, the Person option may be selected, and optionally Female or Male may be selected.
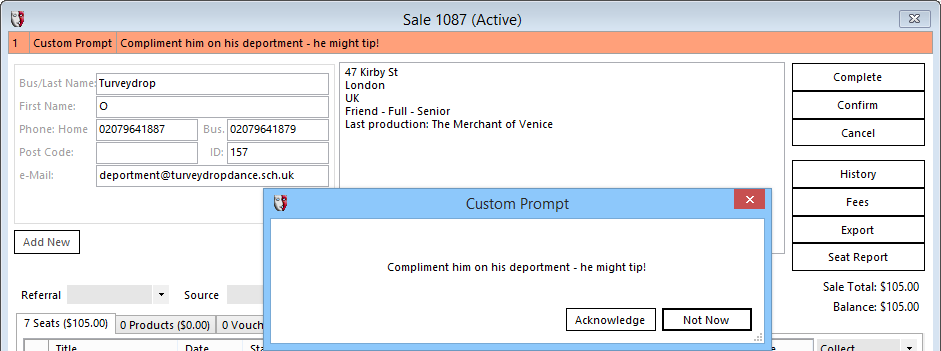
The New Prompt button allows the definition of a message that will appear to the operator when the patron is selected, for instance while making a booking. This may be used to record a reminder message or an important note for the next operator to deal with the patron.
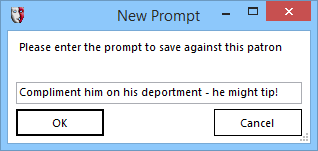
It will appear to the next operator like this:
Print will create a report containing the details of the patron on record. This can then be printed in the usual manner.
History will create a report containing a list of all the changes made to the patron’s details.
A series of tabbed frames fills the rest of the Patron window. This organises the different pieces of information gathered about the patron. You may not see all the tabs listed here, as some require the addition of supplementary PatronBase modules, such as the Members Module.
Contact Tab
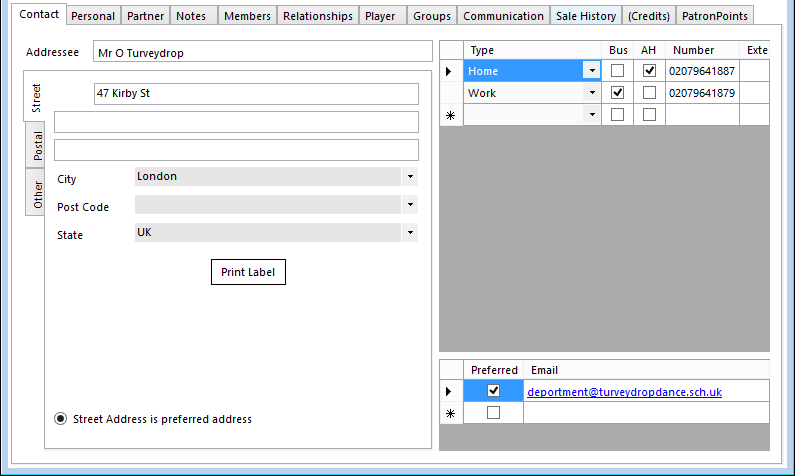
This tab provides a place to record addresses and other contact information. Three different addresses can be recorded - a Street address, a Postal address, and an Other address. The preferred of these addresses can be flagged. Additionally, one or more phone numbers can be recorded, along with one or more email addresses.
Personal Tab
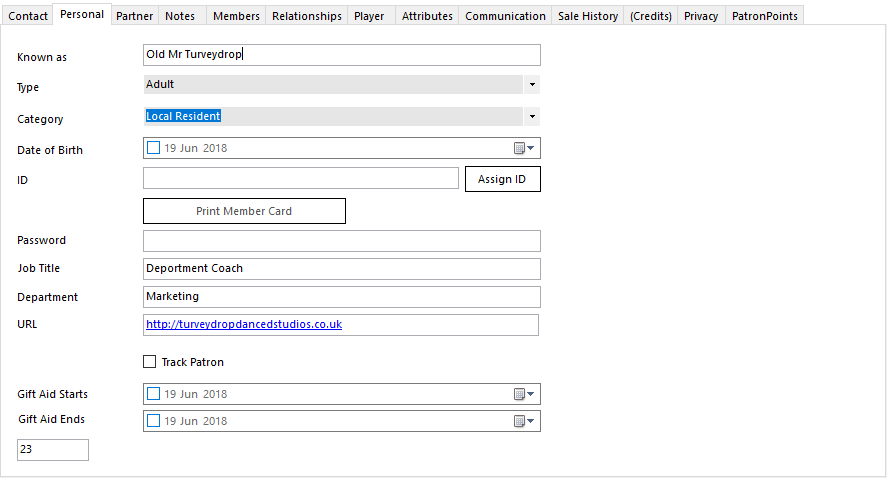
The Personal tab contains relevant details regarding the patron.
Known as may be used to record a preferred form of address.
Type is used to record the category of patron that is relevant for the purposes of selecting an appropriate Book Type for the patron. The entries in this list can be customised in Administration > Setup > Patrons > Patron Types.
Category allows selection of a option from a list that can be customised in Administration > Setup > Patrons > Categories. For instance, this field could be used to specify how the patron is employed, if it is known and if this information is considered useful. In this example, it has been used to indicate if the patron lives close to the theatre or visits from further away.
Date of Birth can be recorded, so that it may be used to verify entitlements to concessions and restricted performances.
ID is used to record the patron’s membership ID number. Because this needs to be a unique number, and to save you from making multiple guesses until you find an unused number, an Assign ID button makes it easy to create a new unique ID when required.
Next to this is a Print Member Card button.
Password may be used to record something that may be used to identify a patron claiming to be the patron on record.
Job Title can be used if the patron is willing to divulge what sort of work they are employed in.
If the patron’s employer has departments and you know which one the employer works in, you can enter it in the Department field. Or, it might be used to record the school or university department the patron is in.
URL is for a website to be associated with a patron. This may be especially useful for organisational patrons such as businesses, sponsors, and schools.
Track Patron is a special flag that can be ticked if you wish to be notified when a patron makes any transaction using the system. This feature integrates with the optional WebHub Messaging module, and when Track Patron is ticked, a message will be created to alert you to any transaction the patron makes. A practical use may be to create an alert when a VIP purchases a ticket in the box office, so you go down to the foyer and greet them.
Gift Aid Starts and Gift Aid Ends store the applicable dates for Gift Aid donations for the patron. Note that if Gift Aid is relevant to your region but you cannot see these fields, you need to set the system setting GiftAid to True in Administration, under Setup > Organisation > Settings > Properties.
 If the PrivacyLayout property is set to Dedicated Tab (the preferred setting) the privacy matrix will not be shown on the Personal tab, but will appear on a Privacy tab.
Privacy contains a matrix of Channels (set up in Administration > Setup > Patrons > Channels) and Privacy Levels (set up in Administration > Setup > Patrons > Privacy Levels). Each combination can be flagged as 'permitted' or 'not permitted'. Boxes that have not yet been set either way will be assumed to be 'not permitted', and will have a red button with an exclamation mark in it to identify it as unset.
The patron’s unique ID number is displayed at the bottom left corner of this tab. This may not be relevant for your purposes; it is provided primarily for the benefit of support staff, should you require assistance.
Partner Tab
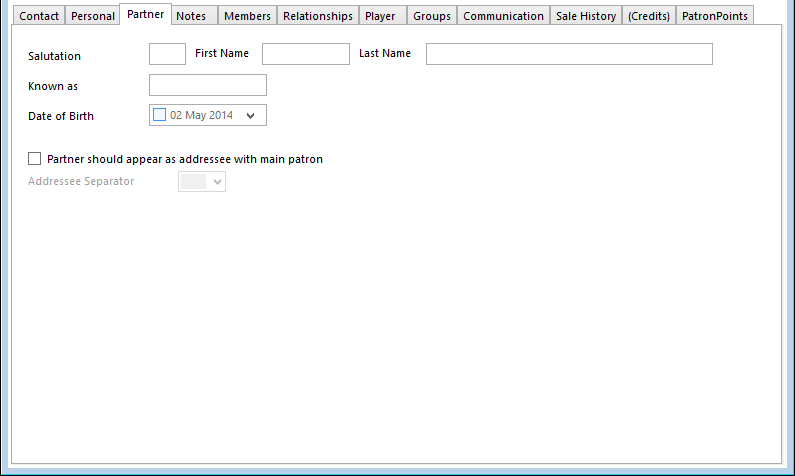
The Partner tab contains relevant details regarding the patron’s partner. This is only available if the patron is identified as a Person and not a Company.
In addition to the fields identifying the name of the patron’s partner and how they prefer to be known, along with their date of birth, there is a checkbox Partner should appear as addressee with main patron which can be ticked if mailed material should be addressed to them both, as a couple. An address separator gives the option of selecting the character used to link the names - &, / or -.
Notes Tab

Any sort of note or free-form record may be made in this tab. Information you enter here will appear on screen in the panel at the top right of the Sale window and in the Find Patron window:

Members Tab
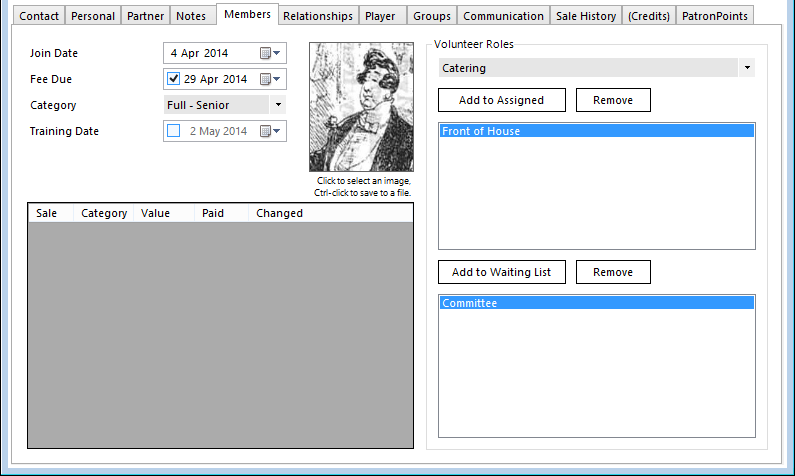
The Members tab is available if the PatronBase Members Module is installed.
The Join Date, Fee Due date, and Category of membership can be detailed. The Category list is defined in Members > Maintenance > Member Categories.
A picture of the patron may be entered. Click within the picture frame to select an image file using the file browser that opens up. You can also save a copy of the current picture on file by holding down Ctrl and clicking the picture.
A Training Date field is available if membership is related to a voluntary support role. Also available to record details of supporters as members is the Volunteer Roles panel on the right of the Members tab. Select a Volunteer Role from the dropdown list (defined in Members > Maintenance > Volunteer Roles) then click either the Add to Assigned or theAdd to Waiting List button to add the role to the list for the patron.
To delete an assignment, select a role from either the assigned roles list or the waiting list, then click the Remove button next to the list.
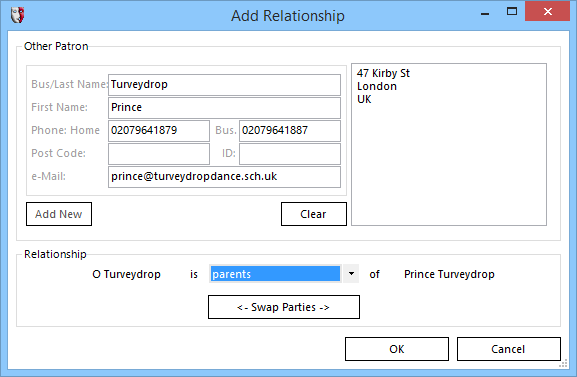
Relationships Tab
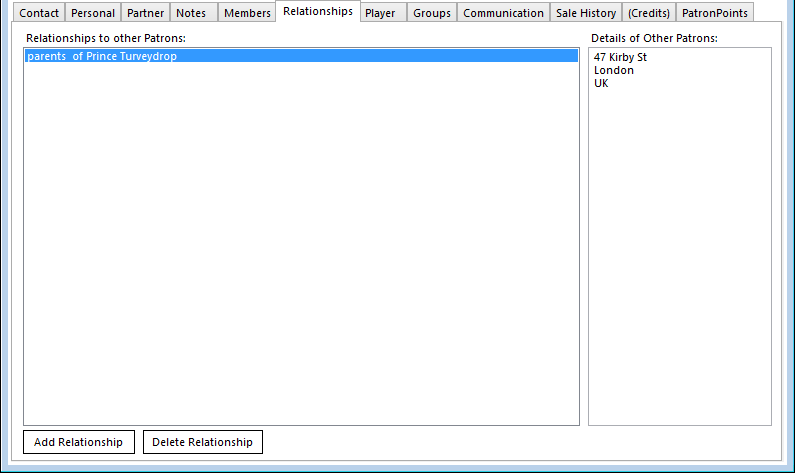
The Relationships tab allows connections to be made between patrons. Click the Add Relationship button, and search for an existing patron, or add a new patron. Then you can specify the Relationship as an employee, parent, partner, Primary Contact, or Teacher. The direction of the relationship can be easily swapped by clicking the <- Swap Parties -> button.
For details on specifying relationships between patrons, please see Defining and Recording Patron Relationships in the Marketing guide.
Player Tab
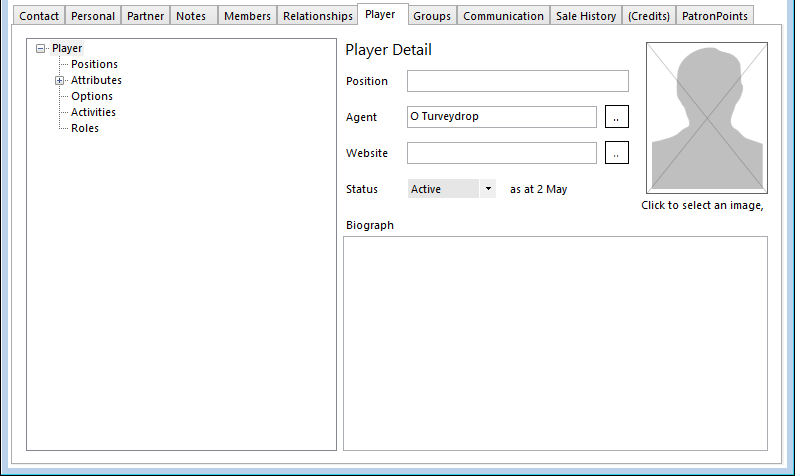
If a patron is a member of a production, their details may be entered into the Player tab. If this is empty, (Player) will be displayed as the tab label, and when clicking on the tab, you will first be asked if you wish to create a player record for the patron.
The Player tab can hold information specific to a patron identified as a player, for example their Position, their Agent, a Biography, and a current headshot.
Clicking the lookup button for the Agent will display the agent’s details and allow a search for an alternative.
Clicking the lookup button for the Website will launch that site in the default browser.
Headshot images can be looked up from connected locations on the network, including the local PC, and saved into the PatronBase database.
There are five headings in the Player tab tree view. Each allows the identification of information relevant to player patrons:
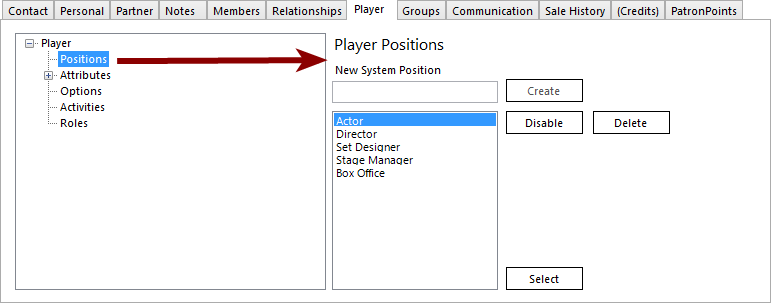
- The Positions heading allows the selection of different positions the player holds, including non-acting positions. If several positions are identified, one is selected as the player’s primary position.
- The Attributes heading allows for the collection of information characteristic of the player.
- The Options heading allows for identification of other information particular to a player.
- The Activities heading allows for the identification of date-specific information about a player.
- The Roles heading allows for the identification of what role a player fulfilled for any productions they were involved in, including which character they played if they acted.
Within each of these headings, the details collected can be customised.
Customising the Player Information Tree
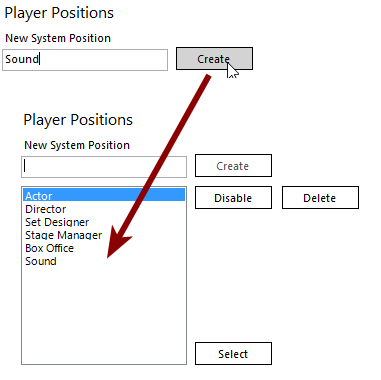
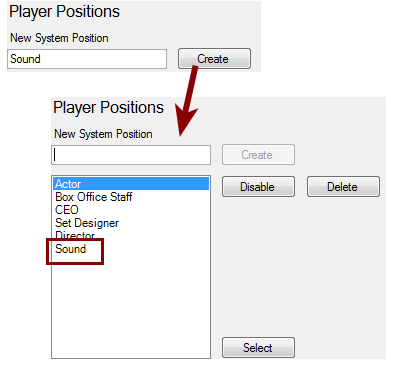
Instead of just selecting an existing position, attribute, option, activity, or role, you can create a new one if the correct selection is not yet listed. Type the new entry in the field above the existing list, and click the Create button. This will create the item to be selected for this player, but it will also now be available when other players' information is edited.
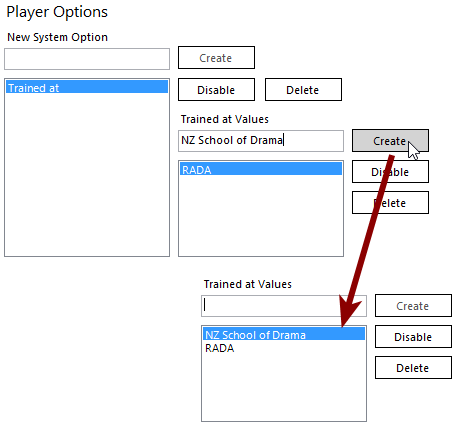
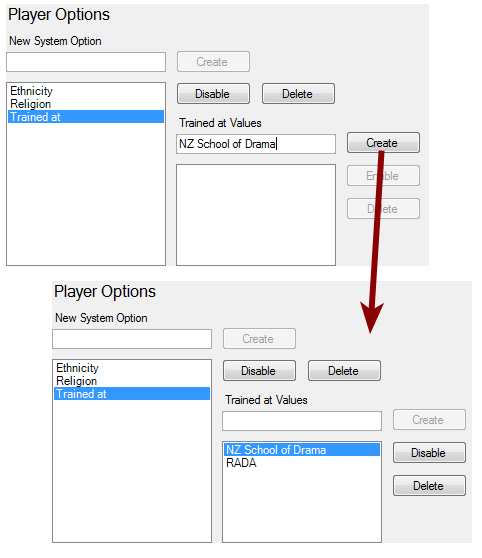
When creating new Options, each New System Option also needs a list of Option Values specified:
Specifying Role Details
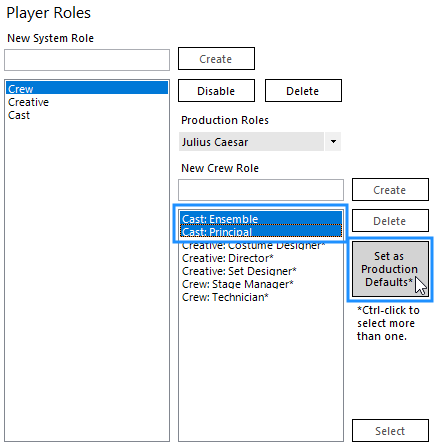
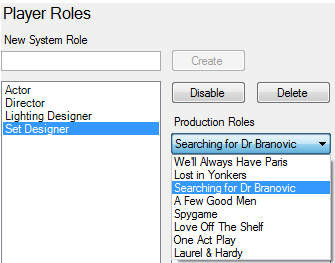
Once a role is selected, a production also needs to be selected, by choosing one from the drop-down list of current productions in the Production Roles dropdown:
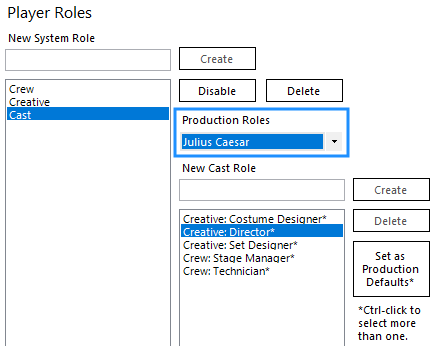
Double click on the System Role to populate the New Cast Role description ready to be added to the list of possible roles for that production. Click once on the available System Role to select the System Role but not transfer the description. If the system role is Cast, you might replace the description with the name of the character the actor portrays in the production, or something like Ensemble or Principal.
Click the Create button to add the System Role and New Cast Role to the list available for the production.
Here is an example adding a Cast: Principal role to the production Julius Caesar:

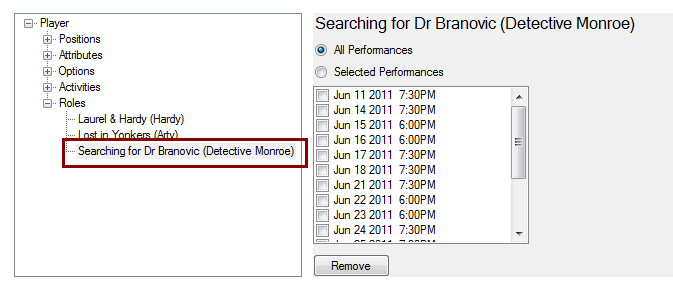
These are available roles associated with this production, not roles that this player has.
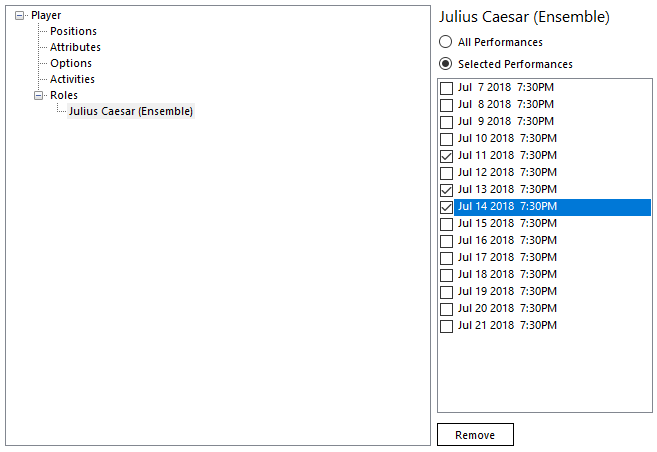
In order to select a role for this player for this production, highlight the appropriate role and click the Select button.

The role will be added to a branch in the Player tab tree. The production performances are also listed. Select either All Performances or tick the performances the player was involved with.
To avoid having to enter the same Player Roles on every new production, select all the roles that you want to apply to any new production by holding down the CTRL key as you click the roles to multi-select, then click the Set as Production Defaults button. The selected roles will be flagged with a * and will appear as roles in any new productions.
Groups Tab
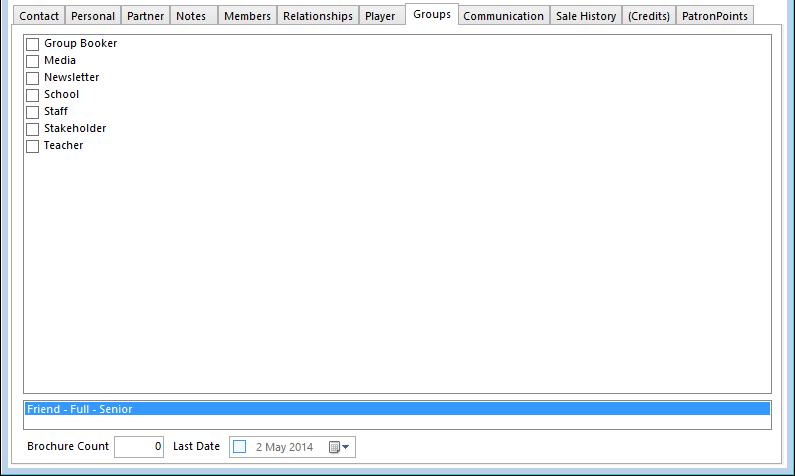
In the Groups tab, you can associate the patron with any groups that reflect their interests, which is useful for marketing. The specific groups available in this list are configured in the Marketing module. If you want to add groups to this list, see Creating Patron Groups. The Groups tab also shows the patron’s membership status and donor level information.
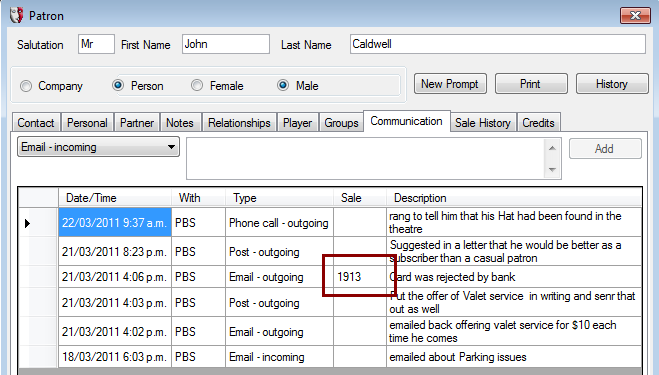
Communication Tab
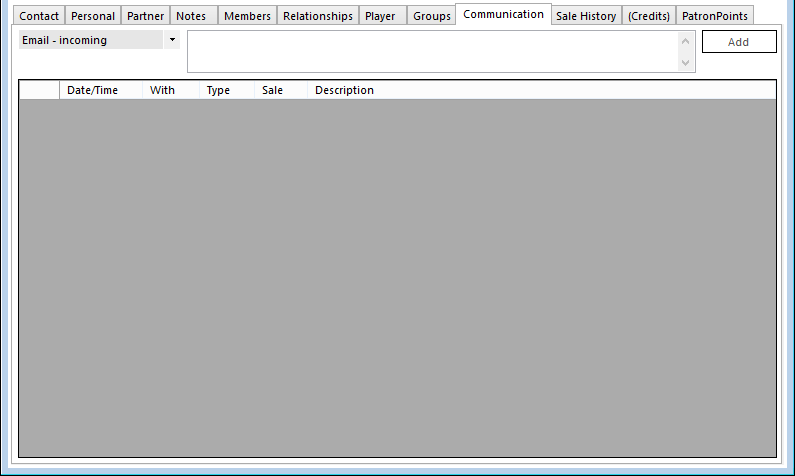
The Communication tab contain s historical information about past communication with the patron. New records can be added by selecting a form of communication from the dropdown on the left, detailing a message or record of the communication, and clicking the Add button.
Sale History
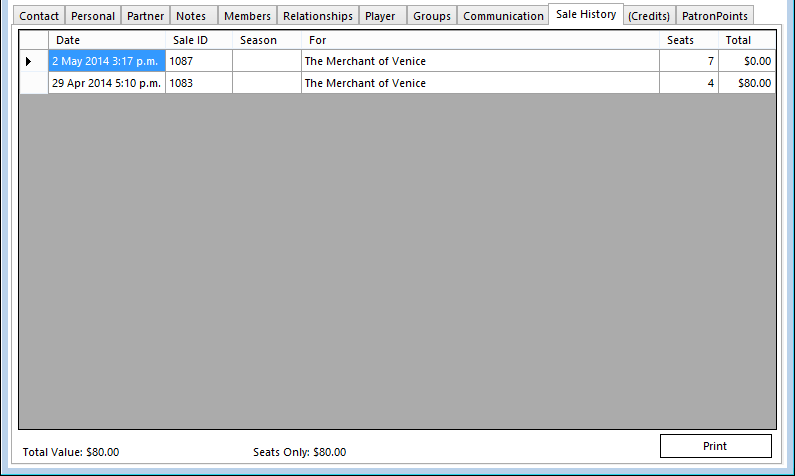
The Sale History tab contains non-editable information about the patron’s sales history.
Credits Tab
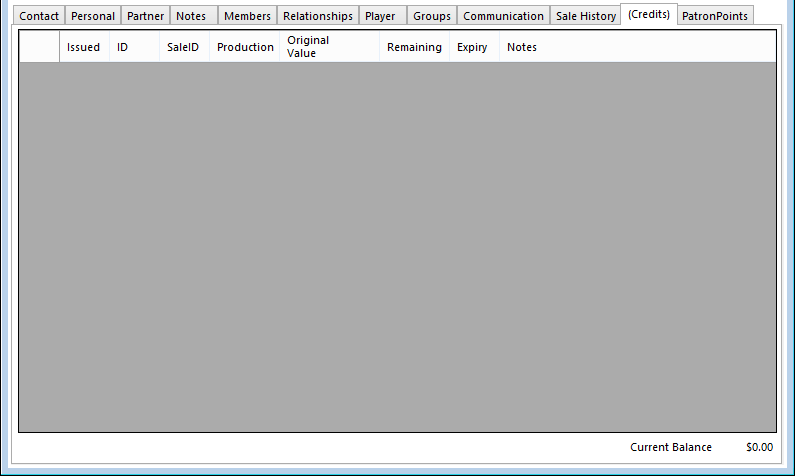
The Credits tab contains non-editable information about the credit issued to and redeemed by the patron.
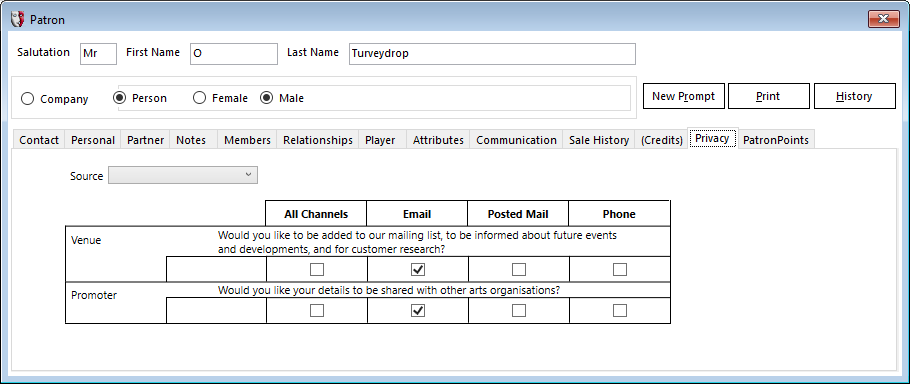
Privacy Tab
When an operator views the Privacy tab in the Patron details window, each of the privacy settings is displayed with Communication Channels shown as columns and Privacy Levels shown as rows. Optionally, each data sharing partner can also be represented as a row. Each level has the appropriate Consent Wording displayed for the box office operator to read to the patron to obtain their consent for these contacts. The checkboxes can be checked to indicate sharing is permitted, blanked to indicate that sharing is not permitted, or a third ‘filled in’ state, which means that the patron has not answered the consent request. Checkbox settings will be saved whenever a change is made, or when the Source is set. When changing the privacy settings, select a consent Source to indicate which channel was used to obtain consent from the patron.
PatronPoints Tab
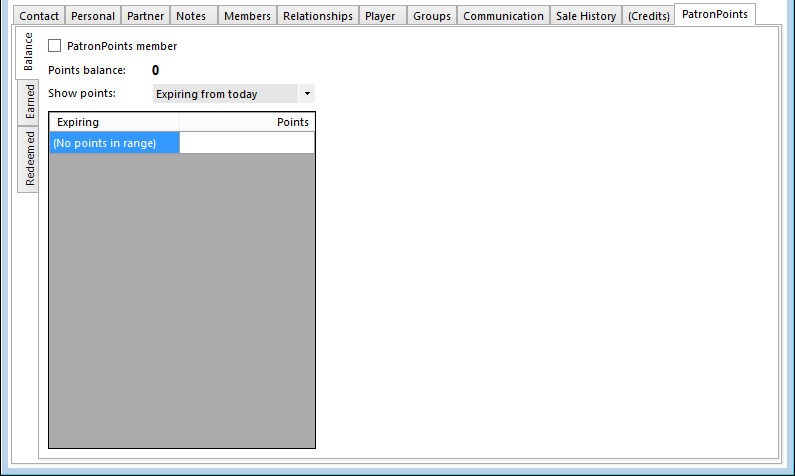
The PatronPoints tab contains non-editable information about the patron’s PatronPoints balance and membership account.
Documenting Patron Communications
Recording notes on interactions with patrons is useful in providing good customer service. The Box Office module provides a means to create such notes in both the Sales window and the Patron window.
Recording Notes in the Sale Window
While you have the Sale window open, you can use the Communication tab to record notes relating to the sale:

To add a new note:
1. Make sure that you have selected a patron and clicked the Confirm button to associate the patron with the sale. If you do not have a confirmed patron for the sale, the Add button will not be available.
2. Click the Communication tab.
3. Select the communication type from the dropdown list. This list can be customised by an administrator.
4. Type your note in the space provided.
5. Click the Add button.
Recording Notes in the Patron Window
Some communication with a patron is not associated with a particular sale. To make a record of these conversations, you can use the Communication tab in the Patron window.
To add a new note:
1. Find the patron using the Find Patron button in the toolbar.
2. Click the Communication tab.
3. Select the communication type from the dropdown list. This list can be customised by an administrator.
4. Type your note in the space provided.
5. Click the Add button.
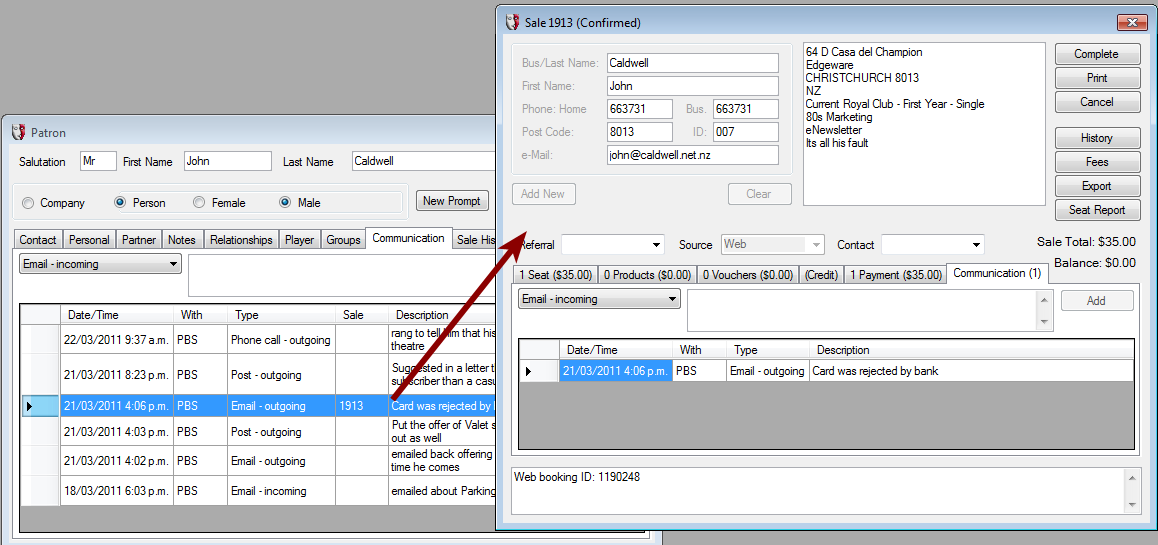
In the communications listed in this window, you will also see notes entered from the Sale window specific to a booking. If you double-click on the row for a communication that has a sale number, the associated Sale window will open:
Recording Player Information for a Patron
When a patron has had roles in productions, information about them can be recorded in the Player tab of the Patron window.
The Player tab can hold information specific to a patron identified as a player, for example their Agent, a Biography, and a current headshot:

Clicking the lookup button for the Agent will display the agent’s details and allow a search for an alternative.
Clicking the lookup button for the Website will launch that site in the default browser.
Headshot images can be looked up from connected locations on the network, including the local PC, and saved into the PatronBase database.
There are five headings in the Player tab tree view. Each allows the identification of information relevant to player patrons:
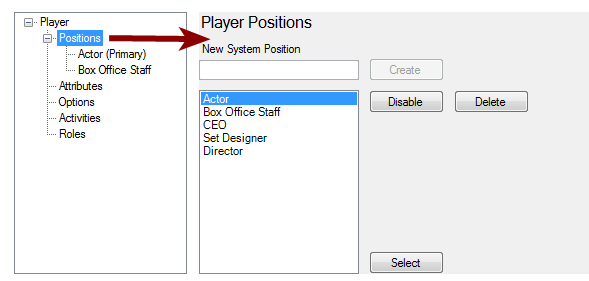
- The Positions heading allows the selection of different positions the player holds, including non-acting positions. If several positions are identified, one is selected as the player’s primary position.
- The Attributes heading allows for the collection of information characteristic of the player.
- The Options heading allows for identification of other information particular to a player.
- The Activities heading allows for the identification of date-specific information about a player.
- The Roles heading allows for the identification of what role a player fulfilled for any productions they were involved in, including which character they played if they acted.
Within each of these headings, the details collected can be customised.
Customising the Player Information Tree
Instead of just selecting an existing position, attribute, option, activity, or role, you can create a new one if the correct selection is not yet listed. Type the new entry in the field above the existing list, and click the Create button. This will create the item to be selected for this player, but it will also now be available when other players' information is edited.
When creating new Options, each New System Option also needs a list of Option Values specified:
Specifying Role Details
Once a role is selected, a production also needs to be selected, by choosing one from the drop-down list of current productions in the Production Roles dropdown:
Double click on the System Role to populate the description ready to be added to the list of possible roles for that production. Click once on the available System Role to select the System Role but not transfer the description. If the system role is Actor, you might replace this description with the name of the character the actor portrays in the production.
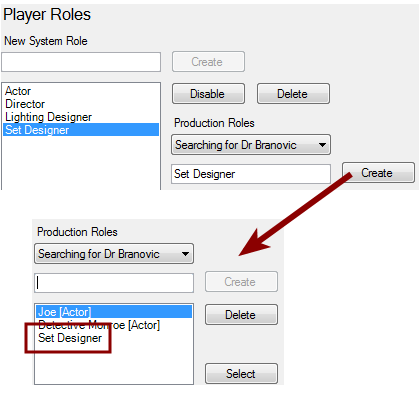
Click the Create button to add the System Role and Description to the list available for the production.
Here is an example adding a Set Designer to the production Searching for Dr Branovic:
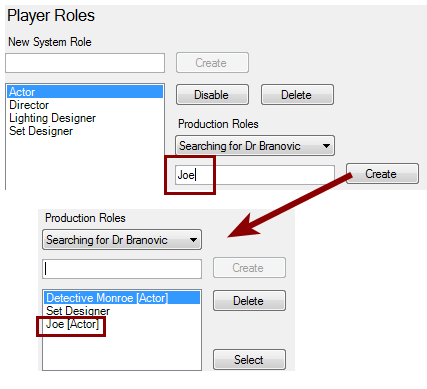
Here is an example that adds the character Joe to the production Searching for Dr Branovic:
These are available roles associated with this production, not roles that this player has.
In order to select a role for this player for this production, highlight the available role and click the Select button. The role will be added to a branch in the Player tab tree. The production performances are also listed. Select either All Performances or tick the performances the player was involved with.