Defining a Venue
Before a production can be created, a venue must be available for the production. Seating plans, ticket pricing plans, venue fees, and all other attributes of a venue are inherited by the production when a new production is created. If a production requires variations on the venue configurations, these can then be edited at the production level, and assigned to performances as required.
To illustrate the creation of a venue in PatronBase, we are going to follow the example of the Lisle Theatre, a fictitious London concert hall. The venue we will reproduce in PatronBase looks like this:
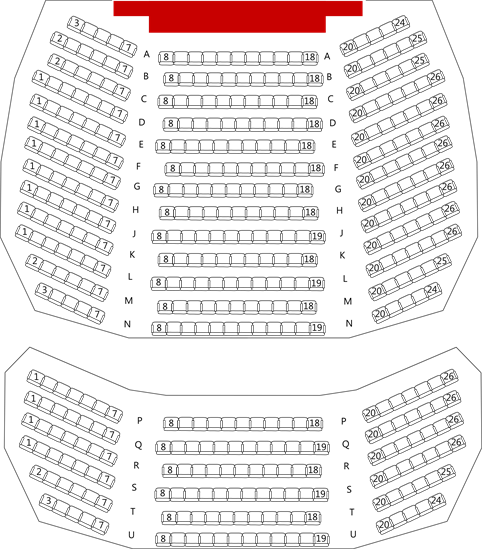
Note that we will need to cater for multiple seating areas, including stalls and a dress circle. Additionally, as the venue is not rectangular, rows are of different lengths in some parts of the theatre.
When defining a venue, it pays to have a venue seating plan diagram like this to refer to as you go.
Before Setting Up a Venue
Use this as a pre-flight checklist to ensure you have everything you need ready to define a venue.
- Does the operator who will define the venue have Administrator security privileges? See Operators.
- What are the typical book types that will be used at the venue? (E.g. Adult, Child, Student, Senior, etc). If the Subscription Module is being used, then season book types also need to be identified - Season Adult, Season Child, etc. Each concession book type that requires proof of eligibility needs to be identified. All these book types need to be defined in Administration under Setup > Sales > Book Types. See Book Types.
- Will seats in different areas have different seat types e.g. A Reserve, B Reserve, Standard? Each book type needs to have a price set and known for each of the seat types that are proposed. Define seat types in Administration under Setup > Sales > Seat Types. See Seat Types.
- Are all payment types (including types of credit card e.g. Visa, Mastercard) that will be accepted at the venue defined in Administration under Setup > Sales > Payment Types? See Payment Types.
- If they are going to be used, have the correct referral sources been defined in Administration under Setup > Organisation > Referrals? Setting this up lets us ask patrons where they heard about the production, allowing the collection of information as to the relative effectiveness of different advertising channels. See Referral Sources.
- Ensure that the appropriate Hold Codes are defined for the organisation, to suit all the reasons that seats are held. The first in the list is initially given to all seats in a new block as the default hold code. Check that the first hold code in the list will suit the majority of seats. See Hold Codes.
- What fees (such as booking fees) will be charged? What products (such as programmes) are available to be purchased? What vouchers will be available to be purchased, and what sort of vouchers will they be - tracked or untracked, seat, merchandise, or value-based vouchers? These need to be set up in Administration under Setup > Sales > Products. See Listing Products For Sale. If there are going to be different classes of vouchers for reporting purposes, make sure that the appropriate voucher codes are set up under Setup > Sales > Voucher Codes. See Voucher Codes.
- Has a default ticket template been defined for the venue? Figure out what details are required on the ticket and where they should appear. Additionally, check the layout and content has been defined for the other items printed on ticket stock: address labels, receipts, and sale summary tickets. These apply to all venues in the system, but the ticket template can be customised on a per venue basis, and further customised for productions, if necessary. Set up ticket lines in Administration under Setup > Organisation > Ticket Lines. See Ticket Lines.
- What is the name of the new venue, and what code will be used in the system to identify it? This will be defined when you first create the venue.
- On the booking graphic, how do you want the seats to be identified (e.g. R8-PR: by row, seat number, then seat type)? This will be used to define the Seat Text when you fill in the details for the venue on the Venues window.
Creating a Venue
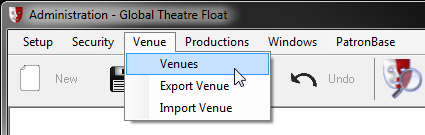
Open Administration and select Venue > Venues from the menu.
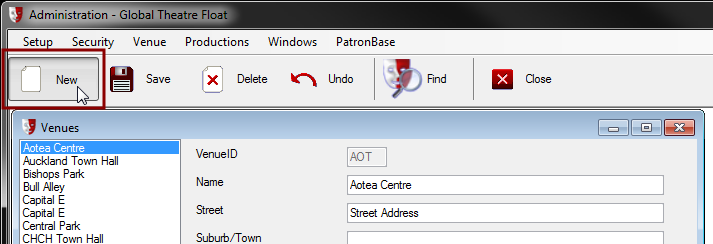
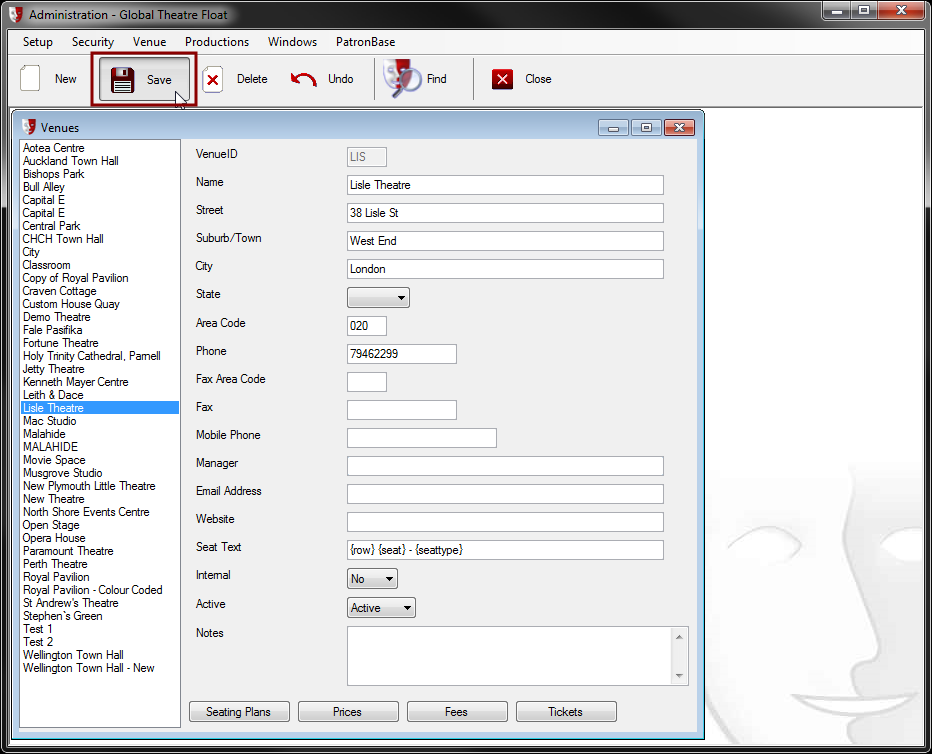
The Venues window will appear, featuring a list of venues in a panel on the left, and on the right, details of the currently selected venue. To add a new venue to the list, select the New button from the toolbar.
A series of popup windows will prompt you for some initial details for the new venue. The first asks for a Venue ID. This is a unique code used as a short reference for the venue. The Venue ID can only be a maximum of 4 characters, so choose something memorable that is a short form of the venue name, or maybe a commonly used abbreviation.

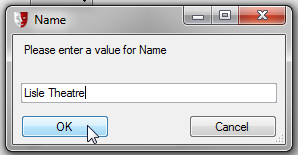
Next, provide the full Name of the venue.
You may subsequently be prompted for the State of the venue location, depending on your system’s configuration.
The new venue will now appear in the list of venues in the Venue window. Select the venue and enter other pertinent details in the right side of the window, such as the physical location of the venue and contact information. Once you are satisfied with the details entered, select the Save button from the toolbar.
Defining a Seating Plan for a Venue
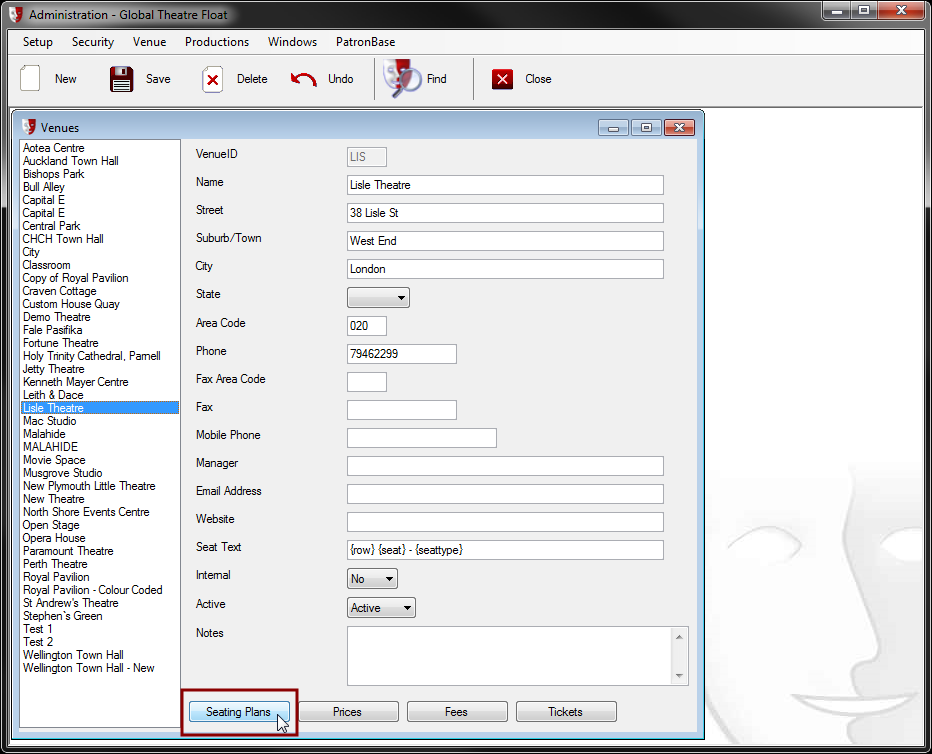
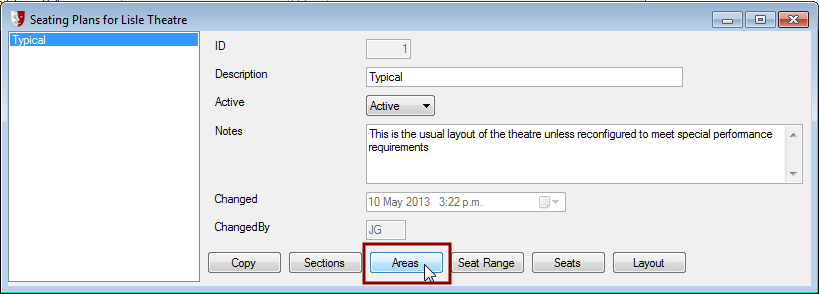
In Administration, in the Venue window, ensure the correct venue is selected in the list, then click the Seating Plan button at the bottom of the window.
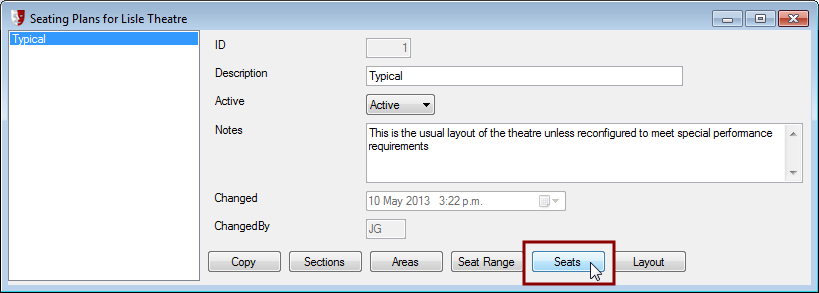
The Seating Plans... window will appear. Initially, there will be a single seating plan definition, named Default.
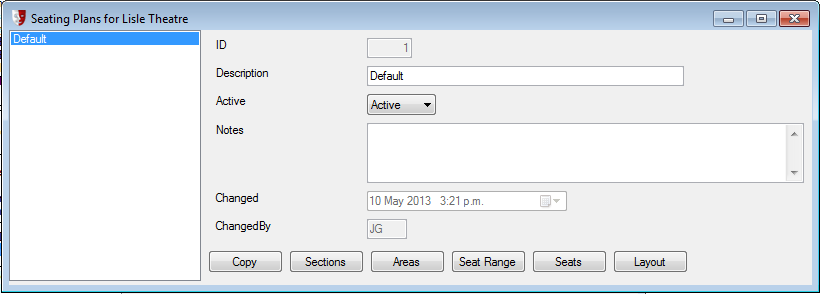
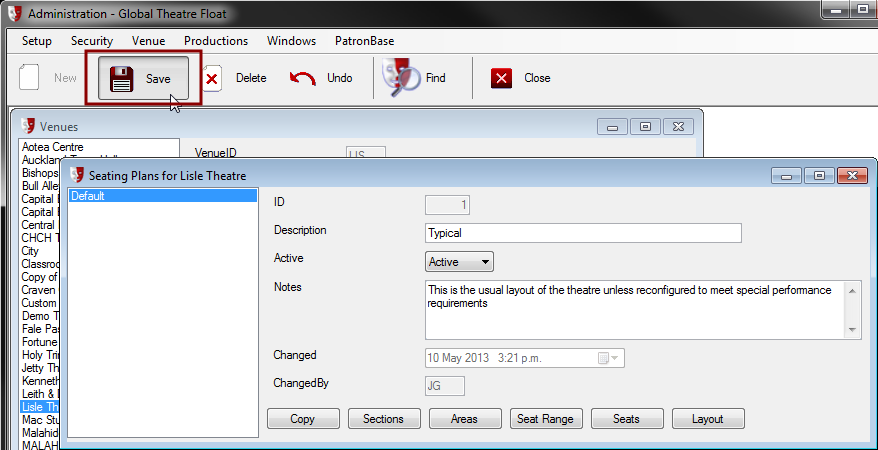
You can change the name in the Description field, and add some useful information in the Notes. Preserve your changes by clicking the Save button in the toolbar.
Defining the Seating Plan Sections
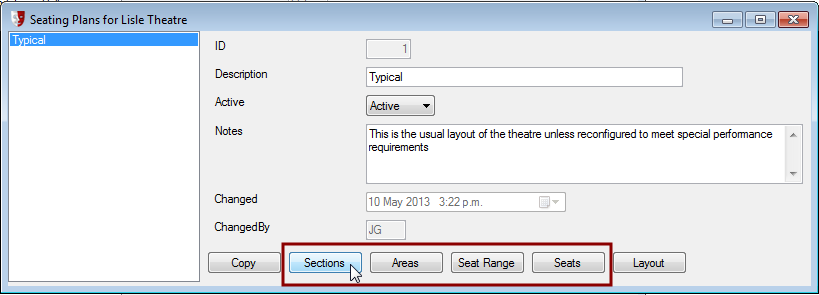
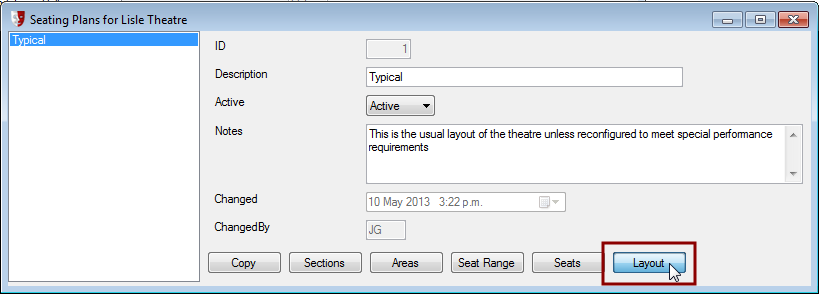
To define the seating plan for the venue, we need to define the seating Sections and Areas, create Seat Ranges, and modify Seat details as required, in this order. Note that this matches the order of the buttons as they appear at the bottom of the Seating Plans... window.
First, we need to define sections within our seating plan. As the Lisle Theatre has a dress circle and stalls, these are our candidates for sections. Click the Sections button to start with.
The Sections... window that appears will have a ready-made section called Main, with the ID M. If we don’t want a section called Main we can change the description, but the ID cannot be changed. For the Lisle Theatre, we don’t want to use M as an ID, so we will create the sections we want, then delete this ready-made one.

From the toolbar, click the New button. A window will appear, asking for an ID for the new section. Here we choose S as a short code for the stalls.
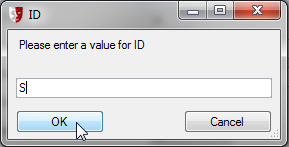
Then we enter a full Description for the section:

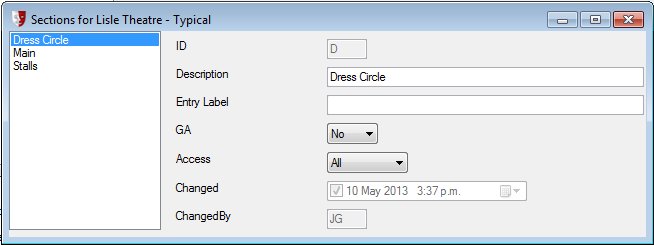
Click OK, then click the Save button in the toolbar. Select the new entry in the list at the left side of the window. You can now set the options for the newly created section.
Entry Label can be used for venues that have multiple entrances, and a specific entrance can be identified here that provides convenient access to the seating area being defined. This Entry Label can then be printed on the ticket for the convenience of the patron. Only fill this out if you are not going to specify the entry label on a per-area or per-seat basis.
GA should only be set to Yes if the section is to be used for unallocated general admission seating.
 If the section has GA set to Yes the seating plan will not appear in Box Office, and nothing will make it appear. If you want to be able to see the seating plan for visual feedback of the number of seats booked, for instance, set the GA field here to No, and in the Productions window you can set the Seating option to Unreserved Display. See Editing a Production.
If there is a mix of allocated and unallocated seating, for instance if the seating upstairs is allocated, but downstairs it is GA, then you will need to have separate sections and define one with GA set to Yes. It will not be possible to display the downstairs seats as a graphic in Box Office.
Access should be All unless the section is only able to be booked by a limited group, e.g. private boxes may only be booked in the Box Office or Restricted to limit access to operators with special authorisation.
Repeat this for each section to be defined. Here a Dress Circle section with an ID of D has also been defined.
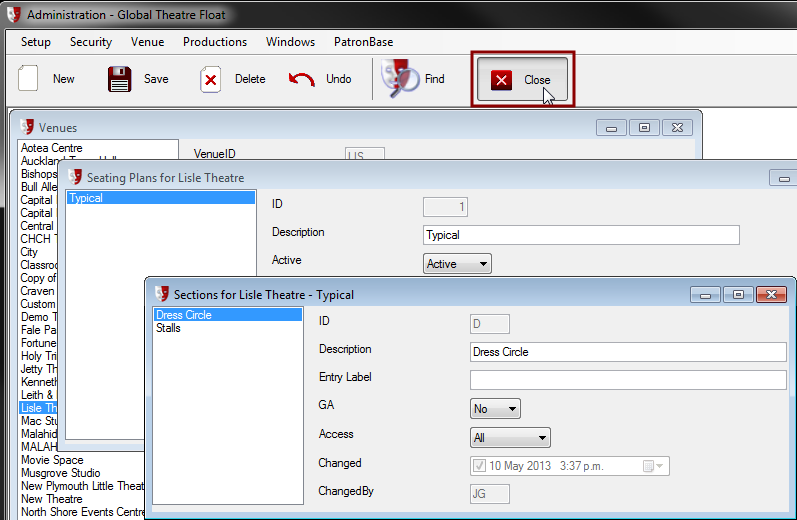
To delete the unwanted Main section, select it in the list of sections, then click the Delete button in the toolbar.

Close the Sections... window by clicking the Close button in the toolbar.
Defining the Seating Plan Areas
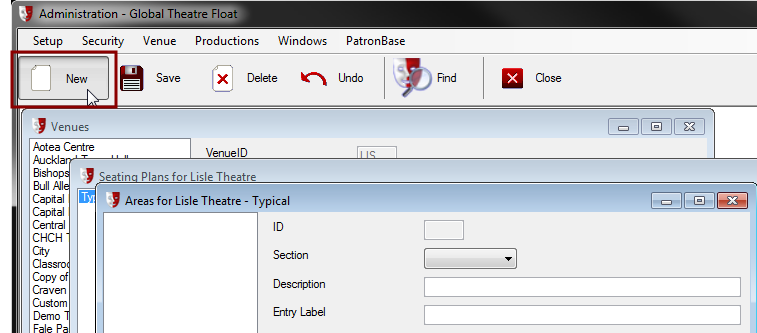
Next, we need to define Areas in the seating plan. Each level of the Lisle is arranged into left, centre, and right seating blocks. We will create three blocks in each section to represent these areas. Start by clicking the Areas button.
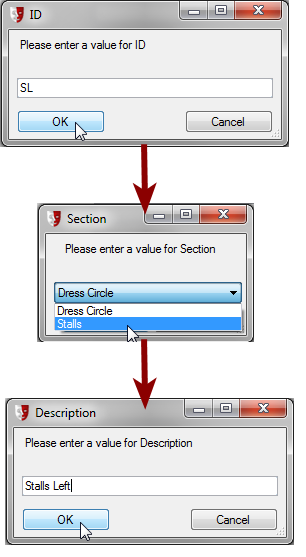
The Areas... window appears, with no predefined seating areas. Click the New button in the toolbar to create the first area.
Popup windows then request an appropriate ID, the Section the area is in, and a Description for the new area. Here we are using SL for Stalls Left.
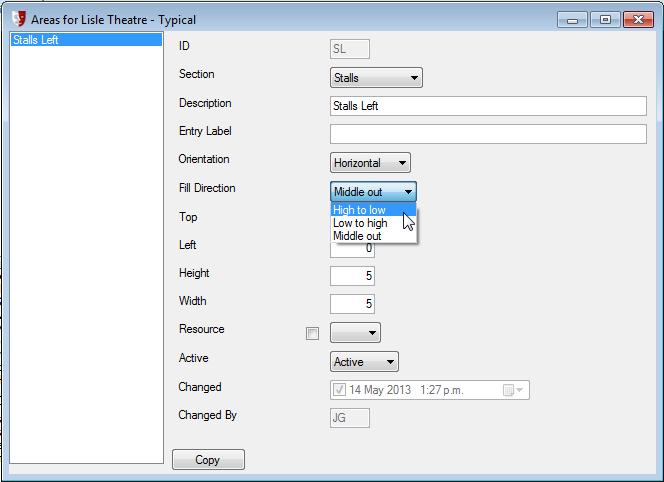
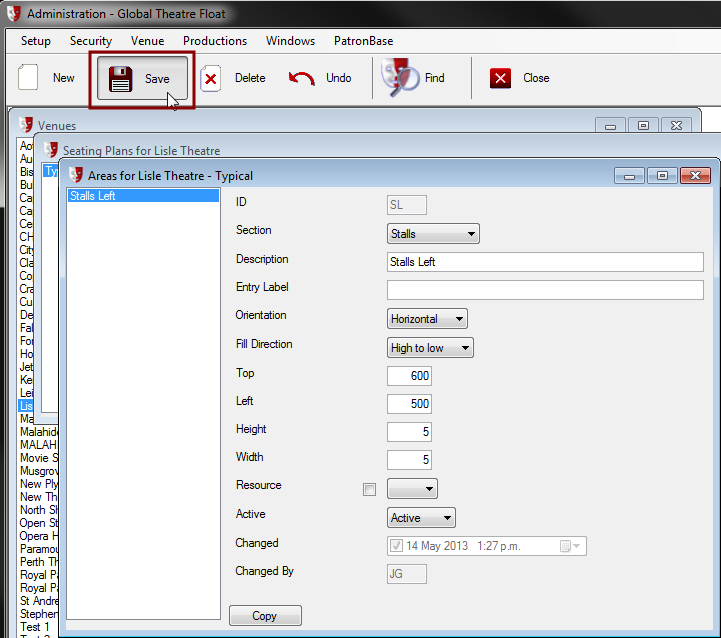
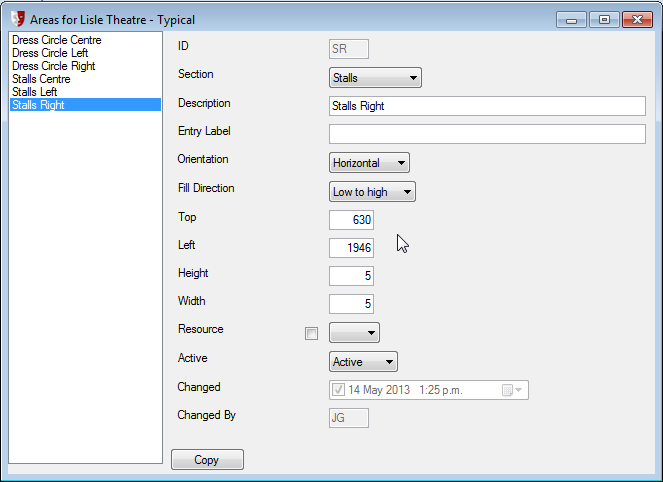
The Stalls Left area is added to the list in the Areas... window. On the right are a collection of fields detailing the new area.
Entry Label can be used for venues that have multiple entrances, and a specific entrance can be identified here that provides convenient access to the seating area being defined. This Entry Label can then be printed on the ticket for the convenience of the patron. Only fill this out if you are not going to specify the entry label on a per-seat basis.
Orientation specifies the arrangements of the seats, as displayed on screen in PatronBase. To specify the stage at the top of the screen with horizontal rows of seats below, select Horizontal. To specify the stage at the left of the screen, with vertical rows of seats extending to the right, select Vertical. If the venue is arranged as a series of tables, as might be found in a comedy club, select Neither.
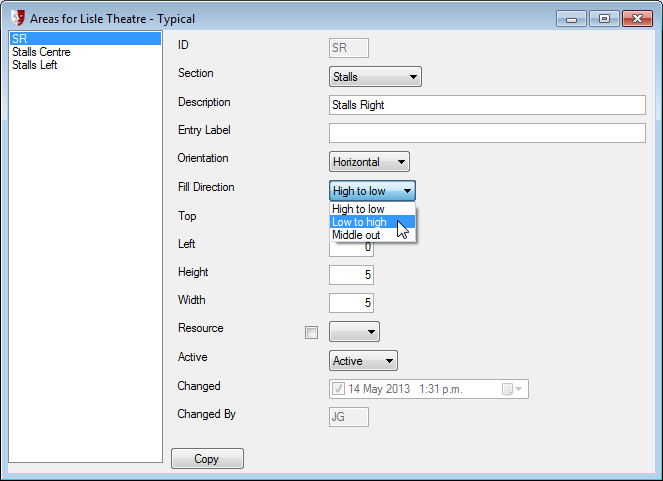
The Fill Direction is used when determining the best available seats, mimicking how a box office operator would allocate seats in that area. While a centre block will likely be best served by filling from the Middle out, the blocks on the sides in the Lisle Theatre will be best filled from the aisle outwards. For the left blocks of seats, this means a High to low fill direction, as the seats closest to the aisle are numbered higher than those closest to the wall.
The next four fields define the position of the area as displayed on the seating plan layout in PatronBase. Top and Left orient the area in the seating plan by number of pixels from the top/left corner. Height and Width specify the dimensions of the area by number of seats. We do not need to be exact with these numbers at this time, as we can modify these later. For now, we will guess at a Top position of 600 and a Left position of 500 , and we will give other areas different numbers to spread them out in the screen layout. We will fine-tune the layout later.
Active provides the options Active and Inactive to indicate if the area is used or is to be ignored.
Click the Save button in the toolbar to preserve your changes to the new area.
Define each of the areas required by clicking New again, and repeating the above steps. An alternative if you need to define an area that is very similar to another is to select an area that has already been defined, and click the Copy button at the bottom of the screen.
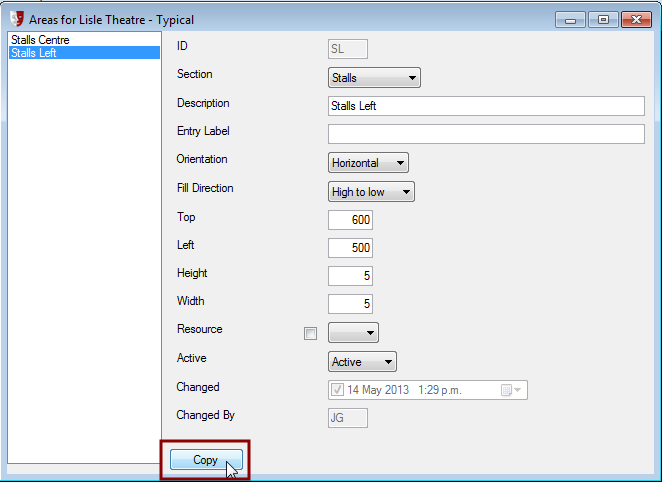
The Description will default to the ID you provide, which you will probably want to change. You can also take the opportunity to adjust any of the settings that are different from the original area that was copied. Click Save in the toolbar when you have finished editing the area settings.
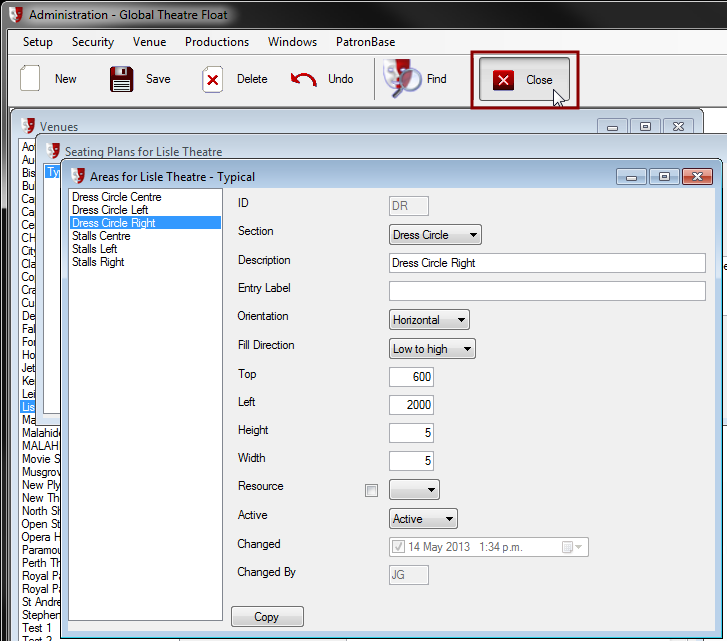
Once all required areas have been defined, click the Close button in the toolbar to return to the Seating Plans... window.
Defining the Seating Plan Seat Ranges
Next, we need to define the seats to fill each area we have created. Select the Seat Range button from the Seating Plans... window.

In the Seat range... window that appears, we will select each of the areas we have defined and, in turn, we will create blocks of seats to suit.
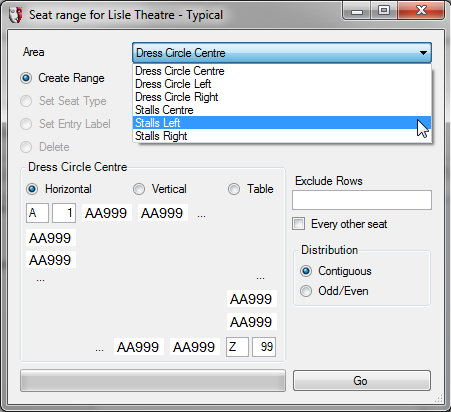
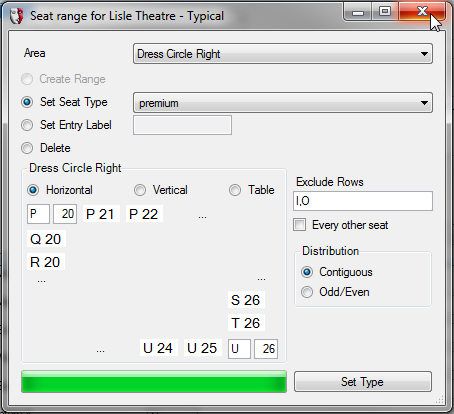
We can classify the seats in the range as a particular Seat Type from those available. Adding new seat types to this list is covered in Seat Types.
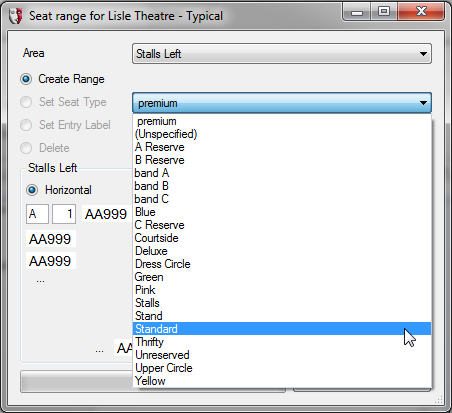
In our Lisle Theatre example, Stalls Left is a block of 13 rows from A to N, up to 7 seats wide, numbered from 1 to 7. In the lower left part of the window, we put the A1 as the lowest number front rowseat, and N7 as the highest number back row seat. Row I doesn't exist in the Lisle Theatre, as it is easily confused with number 1. Row O also doesn't exist, because it is confused with the number 0. To automatically stop the generation of these rows, we enter I,O in Exclude Rows. We want all the numbers in our block to be Contiguous, so we select that from the Distribution options.
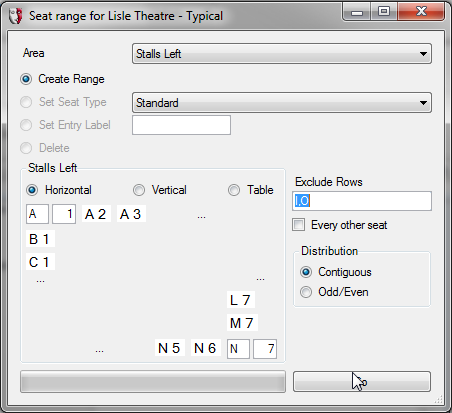
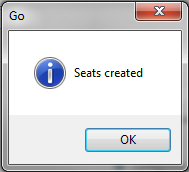
Click the Go button, and a popup window will let you know that the seats you have specified have been created.
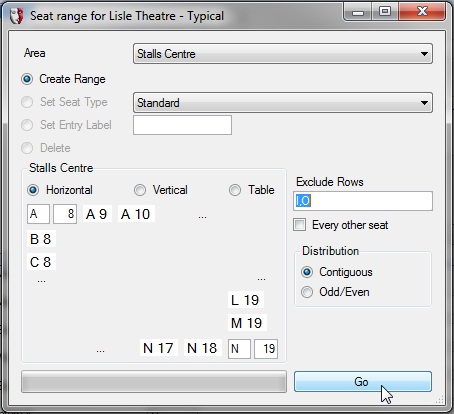
Similarly, we specify the Stalls Centre area, but this time we don’t start at A1, because the lowest numbered front row seat is A8. The back row extends to N19 so we enter that as the highest seat in the range. We make sure that the seat type selected is Standard, that I,O are in Exclude Rows, and the Distribution is Contiguous. Then we click the button to create the block of seats.
We create the Stalls Right seats in the same way, with a block of seats from A20 to N26.
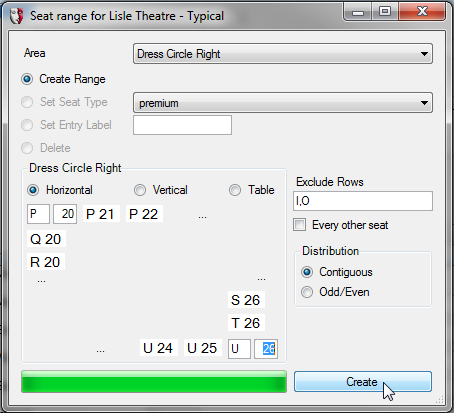
When we come to create the seats for the dress circle areas, the rows start from row P, not row A. Here we have set the Dress Circle Right seats to the premium seat type and defined the block from P20 to U26.
Close the Seat Range... window by clicking on the X button at the top left of the window.
In the Seating Plans... window, click the Layout button so we can see what we have produced so far.
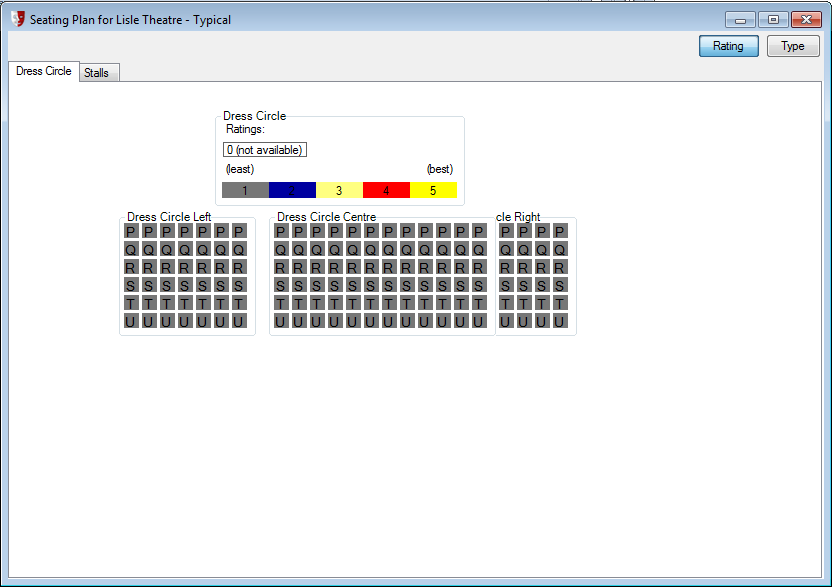
The Dress Circle tab will look like this:
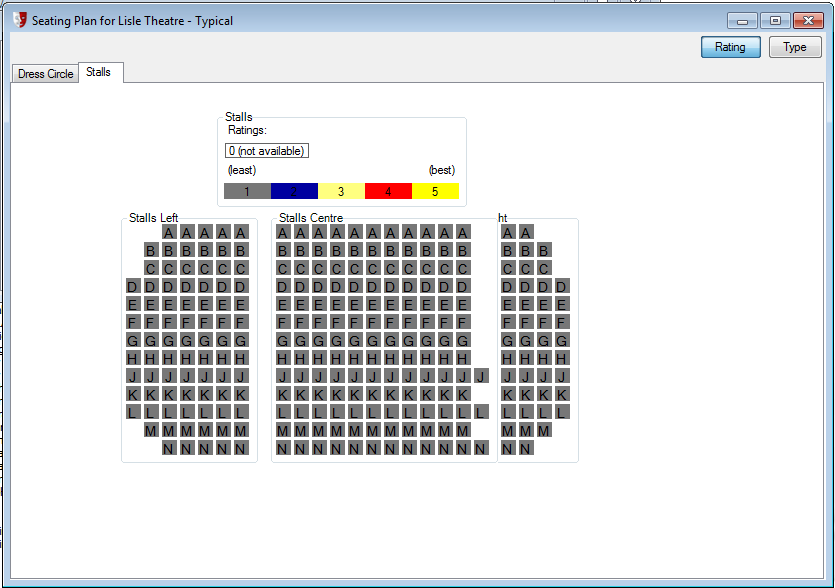
The Stalls tab will look like this:

There are two things we can note about these views above. When we compare the seat layout with the design we were given, we note that we need to remove some seats that do not exist in the auditorium, because of the curved shape of the auditorium. Also, we can see that the guesses for the Top and Left positions for the areas has resulted in the centre blocks overlapping the right blocks of seats. We will address this soon.
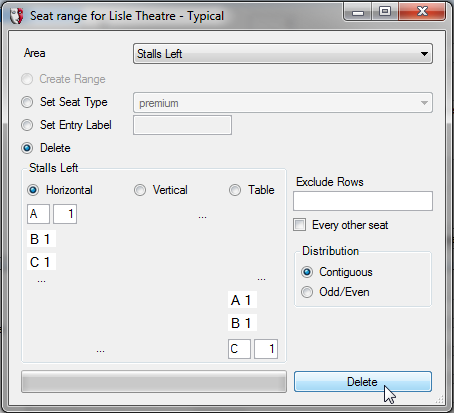
Close the layout window and click the Seat Range button again. This time we are going to select each of the seat blocks that need to have seats removed, and we will specify what seats need to be deleted.
Starting with Stalls Left again, we select the Delete option instead of the Create Range option we used last time. This time the seat range we specify will be the ones we want to remove. At the front left corner of the block, seats A1, A2, B1, and C1 are missing. We cannot specify these as a single block, so we first select the A1 to C1 block, and click Delete:
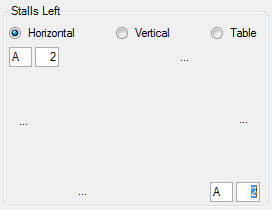
Then we select the A2 seat by setting the range as A2 to A2.
Once we have also removed the M1 to N1 and N2 to N2 ranges from Stalls Left, the layout would look like this:
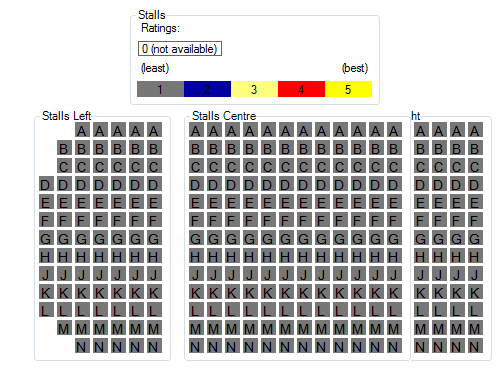
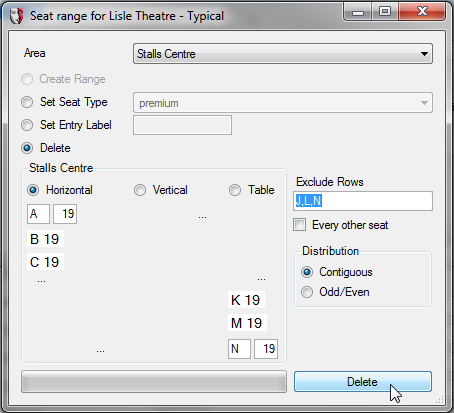
Because of the slightly tapered shape of the centre block, along with the staggered seat layout, not all the centre rows in the Lisle Theatre have a seat number 19. We can use the Seat range... window to say that we want to delete all the seats numbered 19 from A19 to N19, but specify in Exclude Rows all the rows that do have a seat 19: J,L,N.
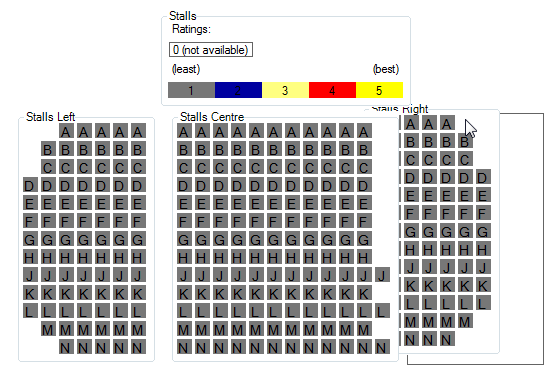
Once all the non-existent seats are removed using the Seat range... window, we can close that using the X button in the window’s top left corner, and return to the seating plan to tidy it up. Click the Layout button in the Seating Plans... window. When we select the Stalls tab, we can see the effect of removing the non-existent seats. We also see that there is still that overlap between the centre and right blocks.
Move an area on this screen by holding down the Ctrl key, then clicking somewhere around the edge of the area, avoiding clicking on any seat, and dragging while holding the mouse button down. A black frame will indicate where the area will be redrawn when you release the mouse button.
For fine control positioning the areas, Close the seating plan layout window and click on the Areas button to adjust the Top and Left fields to get the seating blocks pixel-perfect.
Identifying Special Seats
Seats that may be used for patrons in wheelchairs, and seats reserved for the house can be specially identified in PatronBase.
In the Seating Plans... window, click the Seats button.
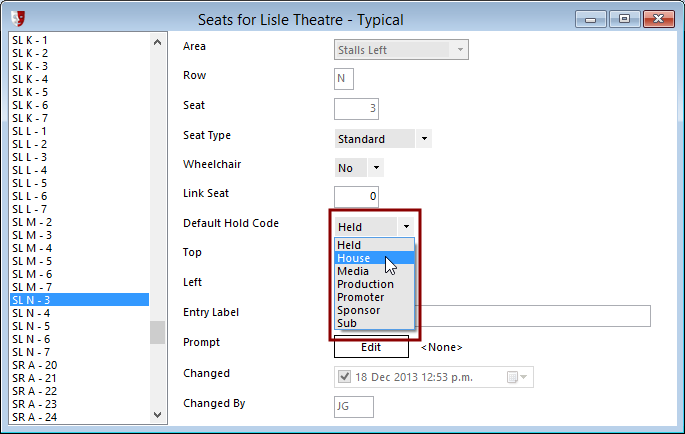
All the seats that have been defined are automatically created with the Default Hold Code set as the first in the list of hold codes. The hold code categories will already have been set up to suit your organisation, but, if necessary, new hold codes can be added to the list. See Hold Codes for more details on setting up hold codes.
Identify seats that will be reserved by the house for production crew, sponsors, media, or other similar purposes. In the lists of seats shown in the Seats... window, find the first of these seats. They are organised by the ID of the seating area, then the row letter and seat number. Select the seat, then in the seat details displayed on the right side, change the Default Hold Code to the most appropriate category in the drop-down list.
Continue to set the Default Hold Code for each seat that needs the hold code changed from the code it was initially allocated, then finally click the Save button in the toolbar to preserve the changes.
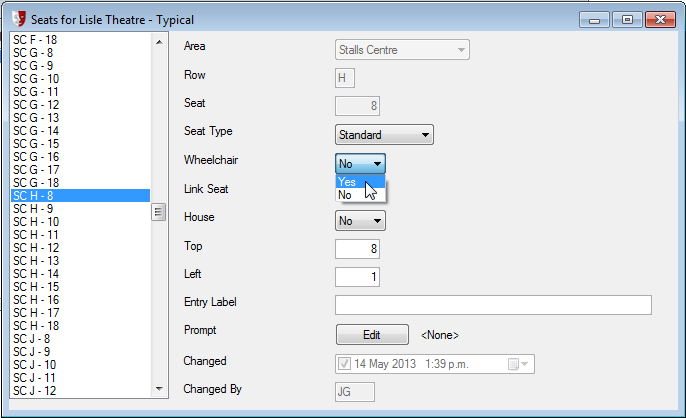
Wheelchair seats also need to be identified. In the Lisle Theatre, the chairs at each end of the H and K rows in the centre block in the stalls can be removed to accommodate a wheelchair. N-20 can also be a wheelchair seat, but to stop the wheelchair protruding into the aisle, N-21 also needs to be removed if N-20 is used for a wheelchair. This is not necessary on the H and K rows because the staggered seat pattern means there is a little more room for a wheelchair.
To detail these settings on the seating plan, set the Wheelchair field to Yes for each of the seats SC H-8, SC H-18, SC K-8 and SC K-18 .
Similarly, for SR N-20, set the Wheelchair field to Yes, but also change Link Seat from 0 to 21. This tells the system that if N-20 is selected as a wheelchair seat when a ticket is booked, one adjacent seat, N-21, must not be sold as it will also be removed when N-20 is removed to provide for the patron’s wheelchair. There is no need to enter the row letter, as it is assumed to be the same row as the wheelchair seat.

Use the Close button in the toolbar to close the Seats... window.
Setting the Seat Rating for 'Best Available'
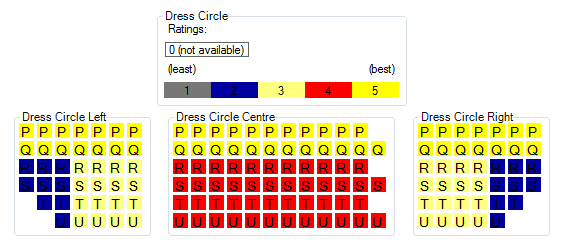
When the seat areas are defined, we specify the Fill Direction, which is one aspect used by the system to find the best available seat to offer a patron. We can also rate seats on a scale of 1 to 5 to tell the system what seats to prefer as the best available. To specify this seat rating, click on the Layout button in the Seating Plans... window.
Click and drag over a block of seats to lasso them in a selection block. The tooltip will update, telling you how many seats you have selected. Here, the first two rows in the Dress Circle Left area have been selected, with the mouse having been dragged from the P in the top left down to the Q in the second row adjacent to the aisle.
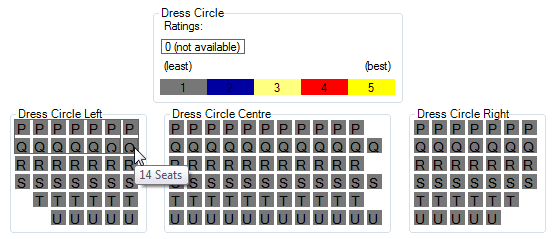
When you release the mouse, a popup window will ask you to select a new seat rating:
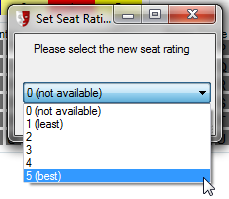
0 (not available) is a special seat rating that makes the seat unavailable for bookings made on the web.
Continue selecting blocks of seats and allocating seat ratings until all seats have an appropriate rating. The ratings set here are used to determine the best available seat when automatically selecting seats for a patron.
Copying and Adapting a Seating Plan
Sometimes it is useful to copy an existing seating plan and modify it slightly. To illustrate this, we will copy the Typical seating plan for the Lisle Theatre, and we will put all the seat areas into a single tab so the entire floor can be seen in one diagram.
From the Seating Plans... window, select the Typical seating plan and click the Copy button. A popup window will ask you to confirm this action.

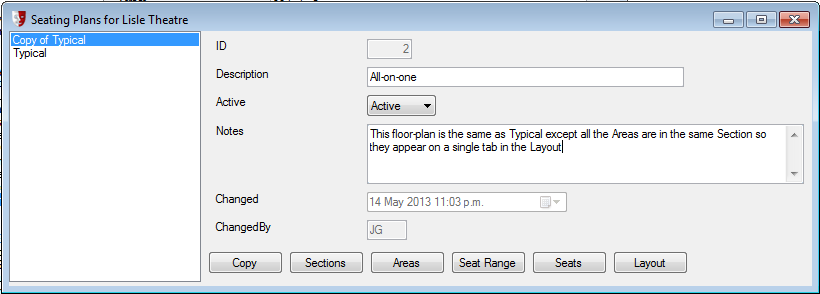
The Description will default to Copy of Typical. Here we have edited the Description to All-on-one. You can also edit the Notes for the seating plan, so that the purpose of the seating plan is clear. Click on Save in the toolbar to preserve the changes.
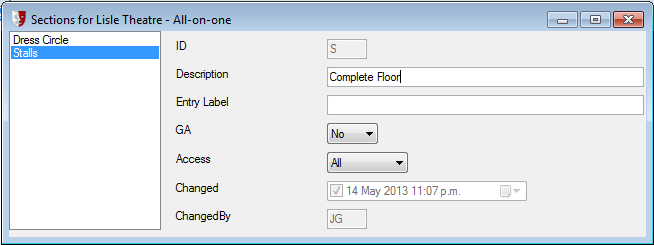
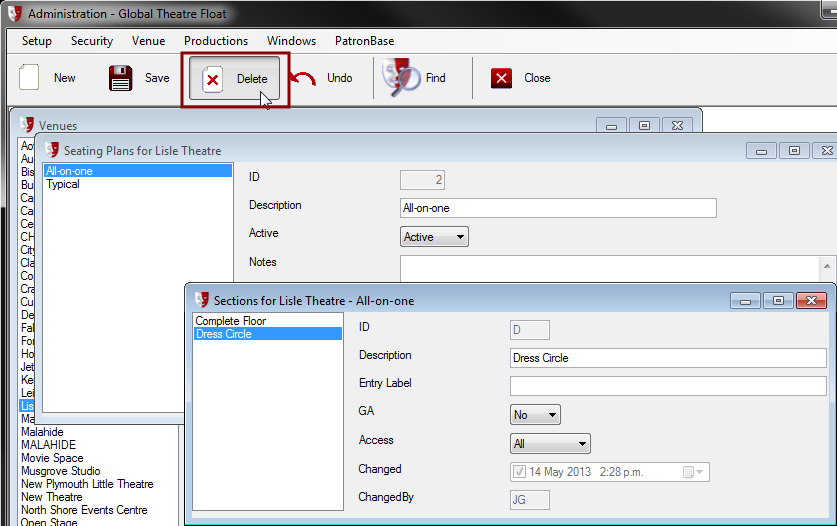
We will keep the Stalls section tab, but rename the Description to be Complete Floor.
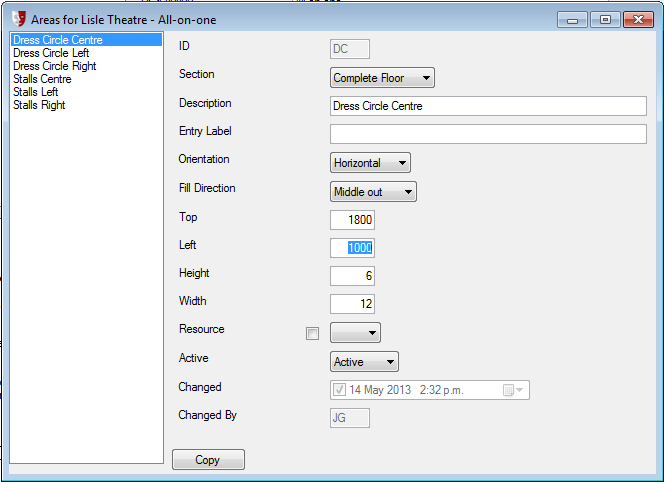
Close the Sections... window and click the Areas button to get the Areas... window. Change the Section field for the three dress circle areas so they now belong to the Complete Floor section. Change the Top field to place the area lower on the screen, below the stalls areas. 1800 should do the trick.
Having moved the dress circle areas onto the Complete Floor section, the Dress Circle section is empty and can be deleted. Close the Areas... window and click the Sections button to get back to the Sections... window.
Select the Dress Circle section and click the Delete button in the toolbar. You will be asked to confirm this action.
Defining a General Admission Section
General admission unallocated seating needs to be put into a section apart from allocated seating.
To illustrate, we will copy the All-on-one seating plan and modify it to suit a rock concert, with an open general admission standing area in front of the stage instead of some of the front rows of stalls.
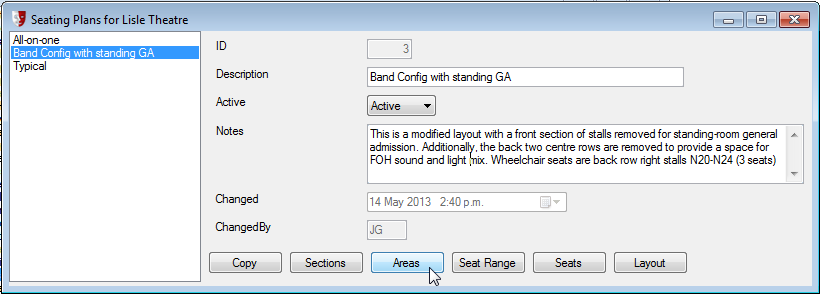
Click the Sections button and edit the Description from Complete Floor to Seating. Make sure that the GA field is set to No.
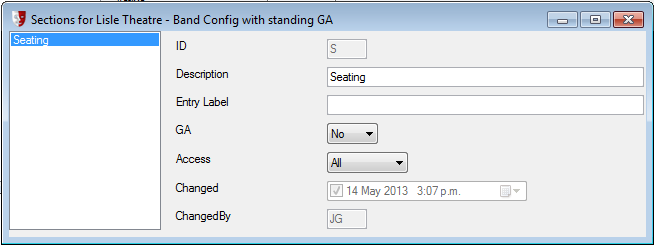
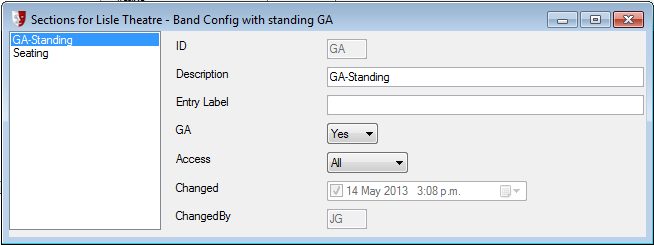
Click the New button in the toolbar to create a new section with the ID GA. Change the Description to GA-Standing. Set the GA field to Yes to indicate that this section is general admission unallocated seating.
Close the Sections... window, and click the Areas button. Click the New button to create a new area and make the Description GA-Standing, setting the Section field to the GA-Standing area.

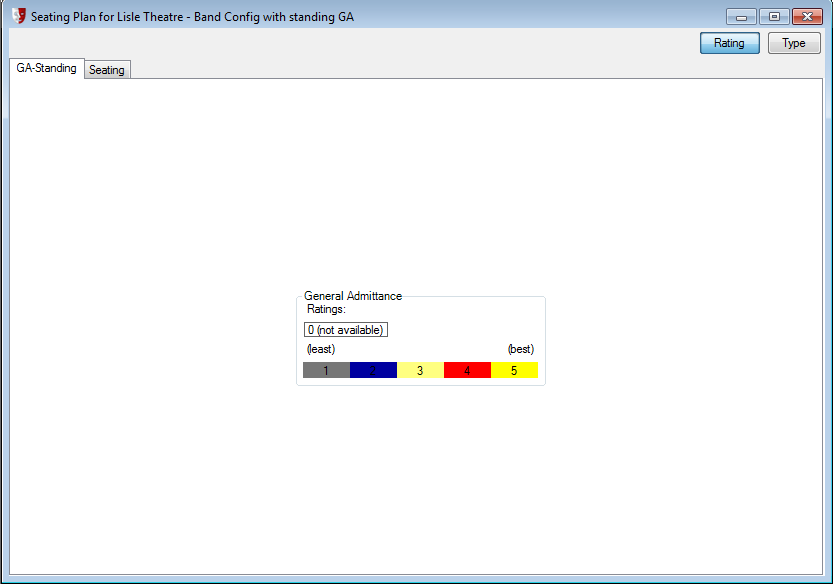
The general admission section we have defined will appear on its own tab in the seating plan, and will not have a graphical representation of any seating.
Assuming the other stalls sections are cut down using the Seat range... window, the other tab in this seating plan that shows the allocated seating would look like this:
